Tuesday, December 04, 2018

Add New Version to Core Data

There are sometimes when I need to update Core Data from existing version to a new version. In other words, I need to update Core Data database with changes on some entities. Apple provides very good framework to do that: Lightweight Migration. Here are my notes on how to add a new version to Core Data.

I am using my TapToCount-3W project as example.

In Xcode, select the data model in Project navigator:


From menu Editor, you will find Add Model Version....


Accept the default settings or make changes if you need. Make sure the base version is the most active version as base. In this case, I accept TapToCount 1.3 as my new version.

Change the property settings: identifier to 1.3 and current version to 1.3. A new version of database model is created and ready for update.


As it is indicated in Project navigator:


References


Read More...

Sunday, October 07, 2018

Run app on iOS 12.0 device from Xcode 9.4

Recently I updated my iPhone 5s with iOS 12.0. To my surprise, Xcode 9.4 on my Mac High Sierra dose not support iOS 12.0 device. That's hold on my app development.

My first reaction was to install the newest Xcode 10 beta 2 from Apple. The whole package is pretty big, 5GB+. That's OK. I downloaded the package and installed it. After that I was rushing to run my project in Xcode 10 (I did make a copy of the project to an external HD to run, to avoid any mass up). There were not much updates I had to make change in my app codes, however, I got a compiling error.

That was really painful time. The error seems to be related to linkage to iOS frameworks, no thing to do with my codes. I could not figure out what's wrong in Mac library system. Even worse, I could not run Xcode 9.4 with my project neither, with the similar linkage error.

I tried to look into my Mac library and Xcode framework dependencies. Remove and re-add frameworks. Nothing was working. I decided to stop further trying or mass-up. Took a break.

Fortunately, before I installed Xcode 10 beta 2, I checked in all my codes into my code-repository. I had my Mac Time Machine on. I know what is the time when I had the correct and latest working version of my Xcode 9.4, and it was just one day before. By using TM restoration, I finally got my app, in about 3 hours restoration of my Mac, working in Xcode 9.4.

With the successful restoration, I followed an advice from SO, copying iOS 12.0 supported folders from Xcode 10 beta to my Xcode 9.4.


Xcode-beta/Contents/Developer/Platforms/iPhoneOS.platform/DeviceSupport


To


/Applications/Xcode/Contents/Developer/Platforms/iPhoneOS.platform/DeviceSupport

Now I can run my codes from Xcode 9.4 to my iPhone 5s device.

What's adventure and life-saving experience!


References


Read More...

Wednesday, October 03, 2018

Python script: MapIt.py


Based on an example, script of mapIt.py, from the video of Automate the Boring Stuff with Python, I figured out that the codes should be changed in Mac OS X, as I mentioned that there are multiple versions of python in Max OS in my previous blog.

In addition to those changes, there are some steps that should done in Mac to make the script as executable in terminal. I further make it working in Spotlight as well. Here are my notes.

Script

Based on the video, I made minor changes on the script. Here is what I have now:


  1. #! /usr/bin/env python3
  2. import webbrowser, sys, pyperclip
  3. sys.argv  # example ['mapit.py', '870', 'Valencia', 'St.']
  4. address = 'Home'
  5. if len(sys.argv) > 1 :
  6.    address = ' '.join(sys.argv[1:]) # ['870', 'Valencia', 'St.']
  7. else :
  8.    address = pyperclip.paste()
  9. # https://www.google.com/maps/place/<address>
  10. webbrowser.open('https://www.google.com/maps/place/' + address)

The first line is important if you want to run the script directly from terminal or Spotlight. Still there are some other steps to be done in order to run the script directly from terminal or Spotlight.

Notice that I specify the name of python is python3! Another minor change is the default address value: Home. I am using Mac and the Google map knows where my home is in my local Mac account.

I saved the script at my local user account path: ~/Programming/py/mapit.py With script ready, I test the script in terminal:

...$ python3 Programming/py/mapit.py Park Ave 83 St New York

As soon as I type in the above command, a new tab page of Google Map is opened in Safari with the correct address.


Make the Script Executable

So far so good. However, I would prefer to open the script directly from terminal, or from Spotlight, without specifying python3. For the case of terminal, first I have to make the script executable with the following commands:

...$chmod a+x ~/Programming/py/mapit.py

The second step is to add my script path to env PATH so that I can simply type in mapit.py anywhere in command line. This is done by adding the path in ~/.bash_profile:

  1. PATH="/Library/Frameworks/Python.framework/Versions/3.7/bin:${PATH}:/Users/dchu/Programming/py"
  2. export PATH

With above setup ready, now I can run the script anywhere in terminal:

...$ mapit.py Donggaodi Hongxing St Beijing

Isn't that cool?


Make the Script Runnable in Spotlight


Spotlight on Mac is a very convenient way to launch an app, to open a file, and to find information. However, unlike Windows Run, it not the way to direcly launch an app with arguments. Even though I set my script mapit.py as executable, I cannot run it from Spotlight. It will only open the script in Xcode!

One way to get it work in Spotlight is to change the script to .command extension. Mac OS will recognize this type of file as a runnable command.

I prefer to keep my script as .py. In UNIX or Mac, I can create an alias file of script: hard link(only hard link works in Spotlight). Here is the command to set it up:

  1. ...$ cd ~/Programming/py
  2. ...$ ln mapit.py mapit.command

The good thing is that any change to my script will be automatically reflected in the command file.

In order to open the Google Map with specified address, I need to copy the address to clipboard first. Then I open my Spotlight and type in mapit.command. It will pick up the address and open Google map in my default browser.

The only thing is that I cannot specify address directly as arguments in Spotlight. This is the limitation of it, and I cannot find a way to do that.

This is why I need to use pyperclip package in my script.


Note: another minor thing has to be done to make it runnable cleanly. The command is running in terminal. When the Spotlight launches the command and opens the map in browser, it will leave the terminal in open status. I prefer to close the terminal automatically.

To do that, go to terminal Preferences..., change the shell setting to Close the Windows:


The last word I have to say is that even the python script is very powerful and convenient to open a map with an address. I think Mac's Automator is much more powerful. It is easy to create (as a service), and can be set to selected text to open a map. Even though, I think it is a very good practice and great programming experience.

References


Read More...

Tuesday, September 25, 2018

Python and Packages

Recently I started to watch a long training video on YouTube, 9+ hours. I just spent fraction of a few minutes daily as alternative refreshment. During the training period, I tired to use Idle app to practice some codes. Up to the point of installing third party packages, I could not get import to work on my Mac. I spent couple of days struggling and finally I figured it out. I think it is worthwhile to take some notes about this experience.

Tool to Install Packages


The first hurdle is that there is no pip, a tool to install third party python packages, available in terminal on Mac. It seems that python is part of Mac OS system, but the version of python is an old version: 2.5 & 2.7. pip was not installed on my Mac.

Eventually I got pip installed by using easy_install tool:

sudo easy_install install pip

After that, I could install pyperclip, a package for using clipboard copy and paste features.

sudo pip install pyperclip

However, the import of pyperclip in python shell and script still does not working!

Version Issue

I could not find out any solution from web easily. It seems that all the solutions in the top search list I found from web are old ones, ie for python 2.*. From one place I read a hint about the issue: different versions of python on Mac. It is true that python came with Mac OS is version 2.3, 2.5 & 2.7. The newest version, for the time being, I installed on Mac is python 3.7.

Further investigation, I found that the tool of pip is actually used to install packages for python 2.7. The pip is located at the path of:

/Library//Frameworks/Python.framework/Versions/3.7/lib/python3.7/site-packages/pip

The tool I need to install pyperclip is actually pip3! This one is at the path of:

/Library//Frameworks/Python.framework/Versions/3.7/bin/pip3

When I sorted it out, it is so easy to install third party packages for python 3.7. For example:

sudo pip3 install pyperclip

For my interest, I further found out the locations of packages for different versions. For python 2.7, the location of package is at:

  1. find /Library/Python/ -name pyperclip
  2. /Library/Python//2.7/site-packages/pyperclip

and for python version 3.7 it is at:

  1. find /Library/Frameworks/Python.framework/ -name pyperclip
  2. /Library/Frameworks/Python.framework//Versions/3.7/lib/python3.7/site-packages/pyperclip


Python also in Different Versions!


One more interesting thing I found out is that, on my Mac, the name of python executable also has different ones! For the python came with Mac OS is actually version 2.5, and the executable name is python:

/Library//Frameworks/Python.framework/Versions/2.5/bin/python

and for the newest version, 3.7 I installed, the name is python3:

/Library/Frameworks/Python.framework//Versions/3.7/bin/python3


From the terminal, the command of python will bring up to version 2.5:

  1. ...$ python
  2. Python 2.5 (r25:51918, Sep 19 2006, 08:49:13)
  3. [GCC 4.0.1 (Apple Computer, Inc. build 5341)] on darwin
  4. Type "help", "copyright", "credits" or "license" for more information
  5. >>>

or type option -h to get all available options. -V is for getting python version:

  1. python -h
  2. ...
  3. Python 2.5


In order to run python3 from terminal, the PATH has to be changed: adding python3's path. This is the result of my updated PATH:

  1. echo $PATH
  2. /Library/Frameworks/Python.framework/Versions/3.7/bin:/usr/local/bin:/usr/bin:/bin:/usr/sbin:/sbin:/opt/X11/bin:

The PATH is set in the file of .bash_profile:

    more ~/.bash_profile

  1. # Setting PATH for Python 3.7
  2. # The original version is saved in .bash_profile.pysave
  3. PATH="/Library/Frameworks/Python.framework/Versions/3.7/bin:${PATH}:/Users/dchu/Programming/py"
  4. export PATH

Even with this change, you have to type the correct python executable name, ie python3, to enter python shell:

  1. python3
  2. Python 3.7.0 (v3.7.0:1bf9cc5093, Jun 26 2018, 23:26:24)
  3. [Clang 6.0 (clang-600.0.57)] on darwin
  4. Type "help", "copyright", "credits" or "license" for more information.
  5. >>> import pyperclip
  6. >>>

Finally, I could do import pyperclip in python shell and scripts without any errors.

By the way, here are the options to get all the commands, options, and the version for the tool of pip or pip3:

  1. pip -h
  2. ...
  3. pip -V
  4. pip 18.0 from /Library/Python/2.7/site-packages/pip-18.0-py2.7.egg/pip (python 2.7)
  5. pip3 -V
  6. pip 10.0.1 from /Library/Frameworks/Python.framework/Versions/3.7/lib/python3.7/site-packages/pip (python 3.7)


References


Read More...

Monday, September 17, 2018

Access to iOS Device Sandbox Data

If you have some files, database for example, in your iOS app, you may need to access to them. Recently, while I was working my app update, I was not sure if a major change would cause to lose my database. Before I run the app on my iPhone, I would like to keep a copy of my database to avoid any risk to lose my data over years.

There are couple ways to do that.

Backup to iTunes


This is very common way to keep a backup of a whole iOS device. First lunch iTunes on a Mac/Windows. Then connect your iPhone to the Mac/Windows. Click on iPhone icon to open a view, where backup is available.

This is very convenient to keep a backup before any adventure or after a period of time. In case of screwup, you can easily to restore your iPhone back to your previous status.

However, with this method, you could not see any files in your app sandbox, nor you could make any changes.

Devices in Xcode


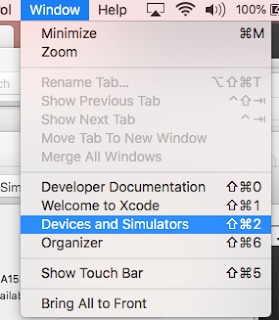
The second way to make a backup of an app is available in Xcode. First, set your iPhone as target or active scheme. From the menu of Windows->Devices and Simulators, open a view.


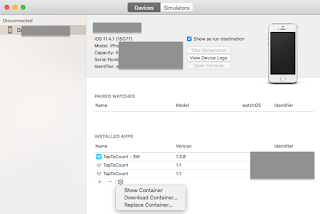
Here is the view:


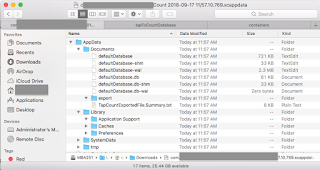
Select the app you want to make a backup, then click the gear icon to bring up a menu list. In this way, the whole app sandbox is backed up to your local Mac. The content of the backup can be viewed through Show Package Contents context menu.


This is pretty cool! Not only I can easily to restore the sandbox back to my iPhone, I could also view the content what I have in the app on my iPhone device. For example, the core data database, as you can see, is actually based on several files, all beginning with the same prefix name, defaultDatabase, as I choose it as database name for my app.

When I run my app in Xcode simulator, not only I could view, but also I could access to my app sandbox from Finder. There is no need to download or upload files to my app sandbox in Simulator.

I think that I could make some changes in the backup and restore back with changes I need. This is really handy for iOS developers in case needed.

Notice that you can only access to the app you are in development and installed to the device from Xcode, and the app has to be on your device. You can not see any other apps. If your app is installed through App Store, or Test Flight, you could not see it. This is for security reason. Anyway, it is good enough for me.

The Xcode I use is version 9.4 and iOS is version 11.4.

References


Read More...

Thursday, August 23, 2018

ActionSheet as PopOver View

Recently, I have been working on my app update. In some cases, some actions could not be performed. I need to present a view to explain the reason. Alert view is a very common method to do that. Alert view is good to present the information, however, it is a modal view. User have to tap on OK or Cancel button to dismiss the alert view. I prefer the method of a popover view as alternative.

It is very easy to do that by using the same UIActionControler, and set the style as .actionSheet. This is well explained in Nick Meehan's post. Still there some thing missing is his post.

I would like to support both iPhon and iPad. For iPhone case, an action button should be added to dismiss the view. By default, the view is still a model view. You need a way to dismiss the alert view.

It is very interesting to find out that an action with .cancel style will change the modal view into a popover view. Further investigation, there is no need to add action handler to dismiss the view. The actionSheet will behaviour like a popover in iPhone.

Here are some codes.

  1. if let popoverController = alertController.popoverPresentationController {
  2.  popoverController.sourceView = view
  3.  popoverController.sourceRect =
  4.    CGRect(x: view.bounds.midX, y: view.bounds.midY, width: 0, height: 0)
  5.  popoverController.permittedArrowDirections = []
  6. } else {
  7.  let cancelAction = UIAlertAction(title: UIHelper.dismissButtonTitle(), style: .cancel)
  8.  alertController.addAction(cancelAction)
  9. }


Another interesting thing is that the cancel style action button will be displayed as an separate button on the bottom. You can specify any title to the button. I like it. This is the UI as in some Apple apps, such as deleting a message in message app.

Here is what I achieved in my update:


References


Read More...

Thursday, June 21, 2018

Debugging with Xcode and LLDB

Really cool stuff on lldb, Xcode debug power tool. As well there is one training video from WWDC 2018: Advanced Debugging with Xcode and lldb.


Read More...

Tuesday, April 17, 2018

Pace Calculation in Swift

I need to add a new feature to show pace in my iOS App(TapToCount -3W). By given two dates and two locations as input, the pace can be easily calculated in the formula:

pace = duration / distance

Duration

In swift the duration can be obtained in following codes:


// dt1 and dt2 are Date types
let timeInterval = dt2.timeIntervalSince(dt1)

The func timeIntervalSince call will return seconds as time interval between two days.

Distance

The distance between two locations is obtained

// loc1 and loc2 are CLLocation type
let dist = dist2.distance(from: dist1)

where dist is the distance value in meters.

Support Localization and Accessibility

It seems that the pace calculation is so simple to get. Hold on. iOS provides APIs to support metric or imperial measurement system. It would be nice to get pace calculation result either in metric or imperial system. This can be easily detected by the following codes.


let locale = NSLocale.current
let metricSystem = locale.usesMetricSystem

In my iOS app, I presented the pace calculation result in human readable format. For example, 6'34" would be "6 min, 28 secs".

Further more, the pace result may be in hours, or even years, depending on inputs of dates and locations. My pace calculation is more generic to support a wide range of cases. To obtain readable result, it can be done by using Swift codes:


1 let fm = DateComponentsFormatter()
2 fm.allowedUnits = [.year, .day, .hour, .minute, .second]
3 fm.unitsStyle = .short
4 let short = fm.string(from: value)
5 fm.unitsStyle = .full
6 let full = fm.string(from: value)

The allowedUnits property specifies what readable units should be used. Here is the complete units from seconds to years, and only first none zero value's unit will be presented, for example, 2 hrs, 15 min, 23 secs. This example is in a short form. There is no need to worry about languages. The API will do the localization automatically. Very nice!

The short form is good for UI presentation. The full form will spell out whole units, such as "2 hours, 15 minutes, 23 seconds". This would be great for accessibility support, for example, label's accessibilityValue. The localization for full form is done automatically as well.

I tested this pace calculation in my iOS app. The following is the screenshot of my mountain hiking, Ha Ling Peak, last Sunday.


and this is my running result today when I was doing my test.


and here is one more test I did. I changed the iPhone language to Traditional Chinese.


You may notice that when the pace result is in years or long days, the last units minute and second are dropped out, since such small amount is so insignificant.  The complete codes are available in my answer in StackOverflow discussion.

References


Read More...

Sunday, January 14, 2018

Autoresizing and Constraints to Safe Area

Recently one issue has troubled me for several days. Finally I just figured it out. I think it is worthwhile to make a note about my experience.

I have an app with several tab views, all displaying similar data in table view. I tried to add search feature for the app. The way to add search controller for iOS 11 and iOS 10 is different. For iOS 11, the search controller is added to navigation controller while the search controller is added to table view's header for iOS 10. My test of iOS 11 works great. However, the test for iOS 10 presented an issue.

In the first tab view, the search works well, but not in the second one. The issue is that the content of table view is shifted up about 40 pixels in the second tab.

Here is the search bar at initial status:


Tap on search bar to start search. Notice that the content of table view is shifted up 40, about half of the first row is behind the search bar.


Even worse, I could not see the search bar if I select a row to the next screen and back to the main screen. The search bar is moved up, not in reachable view.


The search function in the first tab view works without this issue. Therefore, the best way is to compare the difference between two tab view controllers. There are not any major difference. I tried to disable some codes in viewDidLoad, viewWillAppear, and viewDidAppear to make them behaviour the same. Still I could not resolve the issue.

Finally, I noticed there is a difference in storyboard. The table view of the first tab is using autoresizing.


while the second tab's view controller uses constraints for its table view!


I removed four constraints and set autoresizing for the table view of the second tab. With this change, the search feature works well as expected.

It seems that autoresizing for iOS 11 is almost as same as four constraints to its safe area (which is introduced in iOS 11 but not exist in iOS 10). Even it would fall back to previous layout guide, it seems not working in the same way for table view in this case. For old iOS back from 11, try to not use safe area as reference for table view constraints.

Test for all supported iOS versions is very important!

Read More...