Monday, December 28, 2015

Use image and css to define section style

Sometimes I need to use a simple section with numbers instead of a title of some text. I found a section style very interesting from a blog. Based on html inspection, I create css codes for this type of numeric section. I use this style in this blog.

Here are what I did.


01

First, I use an image as background, a horizontal radiation or shadow line, named as css class numericSection


02
Then, I use css to draw two circles: one outer circle with light gray colour and one inner circle with grey colour, and the text colour in inner circle is white.

This the outer circle, named as css class numericSectionOuterCicle:


The inner circle, named as css class numericSectionInnerCircle, is smaller than the outer circle above:


and two are combined together:

T

03

My numeric section is a combination of above image and css classes.


  1. /* Numeric Section Style */
  2. div .numericSection {
  3.  margin: 1.5em auto;
  4.  padding-top: 0.5em;
  5.  padding-bottom: 0.5em;
  6.  white-space: normal;
  7.  border: none;
  8.  text-align: center;
  9.  width: 100%;
  10.  background-image: url(http://2.bp.blogspot.com/.../section.png);
  11.  background-size: 100%;
  12.  background-position: 50% 50%;
  13.  background-repeat: no-repeat no-repeat;
  14. }
  15. div .numericSectionOuterCicle {
  16.  width: 60px;
  17.  min-height: 60px;
  18.  border-radius: 50%;
  19.  background: lightgray;
  20.  display: inline-block;
  21. }
  22. div .numericSectionInnerCicle {
  23.  width: 50px;
  24.  min-height: 50px;
  25.  margin: 5px auto;
  26.  background-color: gray;
  27.  color: white;
  28.  font-size: 150%;
  29.  line-height: 50px;
  30.  border-radius: 50%;
  31. }

The above css styles are added to my blogger html template. Here is an example of html for numeric section 01:

  1. <div class="numericSection">
  2.  <div class="numericSectionOuterCicle">
  3.  <div class="numericSectionInnerCircle">
  4. 01
  5.  </div>
  6.  </div>
  7. </div>

Read More...

Wednesday, December 23, 2015

Swift: Closure

The concept of closure in Swift is similar to lambdas in .Net C# or blocks in C and Objective-C, but it is more powerful in Swift.

A closure in Swift can capture constants and variables in its context or its outer function. Closure provides a way to plug in dynamic codes. In advanced level, a closure can be used as a type passing to a function's parameter or return result.

Depending on how the closure is used in parameters, the closure can be escaped or none-escaped. This is an advanced feature. My understand of escaped closure is the one kept somewhere for later call, while none-escaped closure will be called in function.

In the following example, I modified codes in Mac Developer Library to explore the advanced feature. It was hard to comprehensive at first. However, I figured out how it works with some modifications.

It is amazed to see that closure, as in function parameters, can be either used and through away, or stored for later use. In most cases of completion handler, closure is called at later completion time. The following simple example explains how it works.

  1. /* The closure in parameter will be called in func
  2. the closure will be through away, not stored for later use */
  3. func someFunctionWithNoescapeClosure(@noescape closure: () -> Void) {
  4.    print("closure as @noescape parameter called and not saved")
  5.    closure()
  6. }
  7. // array to store closures
  8. var completionHandlers: [() -> Void] = []
  9. /* The closure in parameter will NOt be called in func
  10. instead, stored into array for later call.
  11. */
  12. func someFunctionWithEscapingClosure(closure: () -> Void) {
  13.    print ("add closure to complitionHandlers array")
  14.    completionHandlers.append(closure)
  15. }
  16. // Example class with property x modified by closure
  17. // referenced by above funcs
  18. class SomeClass {
  19.    var x = 10
  20.    func doSomething() {
  21.        someFunctionWithEscapingClosure {
  22.            let value = 100
  23.            print("set instance.x to \(value)")
  24.            self.x = value }
  25.        someFunctionWithNoescapeClosure {
  26.            let value = 200
  27.            print("set instance's x to \(value)")
  28.            x = value }
  29.    }
  30. }
  31. let instance = SomeClass()
  32. print("instance of SoSomething created, and method doSomething() called")
  33. instance.doSomething()
  34. print("instance.x: \(instance.x)")
  35. print("Call complitionHandler's first. Escaped closure being involked")
  36. completionHandlers.first?()
  37. print("instance.x: \(instance.x)")

Note
The func at line 3 has a closure as none-escaped parameter, and the closure is called at line 5, not kept. While the func at line 9 has a closure as escaped closure, appended to outer array at line 15.

As a result, after an instance of SomeClass is created at line 34, and its method of doSomething() is called, the instance property value x is set 200 by func call of someFunctionWithNoescapeSclosure at line 27.

The instance's property x is set to 100 as the result of calling global array's first item, which triggers escaped closure called.

And the result is as follows:

instance of SoSomething created, and method doSomething() called
add closure to complitionHandlers array
closure as @noescape parameter called and not saved
set instance's x to 200
instance.x: 200
Call complitionHandler's first. Escaped closure being involked
set instance.x to 100
instance.x: 100

References


Read More...

Friday, December 18, 2015

Enhanced Syntax Highlighting by HTML

I have been using coloured syntax for codes in my blog for long time. The basic technique is to use VIM's syntax template and TOhtml command. In this way, I can easily get html format for my codes.

The only thing that has been puzzled me is to add line numbers. In VIM is very easy to add line numbers. The view is good. By adding line number, I could explain codes in my blog by line. However, it is a messy if you want to make a copy of my codes in my blog. I would like to have line numbers in my colourful code syntax, but not be copied if selected.

While I was reading Swift Programming Language by Mac Developer Library. I found that code examples there do have the feature I want. By further exploring, I found html ol tag being used. That's the solution for my long time puzzle!

Setup Line Numbers for Codes


Here are steps to get colourful codes in html by VIM:
  1. :set nonumber # to disable line number
  2. :set syntax=swift # change syntax template to swift
  3. :let use_html_css=1 # to use css in html, instead of style attribute
  4. :TOhtml # to convert text to html
  5. remove html tags not needed
  6. :%s:^:<li>:g # add </li> tag to the beginning of each line
  7. :%s:$:</li>:g # append </li> to the end of each line
  8. :%s:\s\@<=\s:\&nbsp;:g # replace continuous spaces, not the first one, by html special code for space.
The html codes generated by above steps are li tags, which can be added to the body of ol tag.
Note
The reason I use css class is that blogger provider allows me to add customized css. If you don't have access to css, then you should use embedded style for syntax colouring.

An example is as follows:


The html codes could be further enhanced, for example, moving ordered line number left out of code box. For the time being, I think it is good enough.

Add Note Section


This is a related topic: adding a note section for code explanation. I like the way in Mac Developer Library to add a note section in simple and clear format. I added this feature to my blog as well.

What I did is to add the following css classes to my html template in blogger:

  1. /* div box with class note for note section */
  2. div .note {
  3.  border-left: 5px solid rgba(233, 233, 233, 1);
  4.  background-color: rgba(249, 249, 249, 1);
  5.  margin: 40px auto 35px;
  6.  padding: 15px 15px 7px;
  7.  width: 85%
  8. }
  9. div .noteTitle {
  10.  color: rgba(128, 128, 128, 1);
  11.  # font-size: 9px;
  12.  letter-spacing: 2px;
  13.  margin-bottom: 8px;
  14.  text-transform: uppercase
  15. }

Here is example of above note section in html:

<div class="note">
<span class="noteTitle">Note</span><br />
The reason I use css class is that blogger provider allows me to add customized css. If you don't have access to css, then you should use embedded style for syntax colouring.
</div>

References


Read More...

Wednesday, December 16, 2015

Swift: board game

I found a very interesting board game in Apple's Mac Developer Library. It is a simple playground of codes. Based on those codes, I added random dice function to make the game more fun.

The updated codes work very well in Xcode playground, however, the same one does not work in IBM Swift Sandbox. The random function arc4random_uniform is not supported there. Soon I found another Swift on-line complier so that I can share my codes with people who do not have Xcode nor Mac.


Here are the rules of the game:

  1. Start from square 1
  2. Get dice number: 1-6
  3. Move to next square based on dice number, for example, 3, moving 3 steps forward.
  4. Move to the end of ladder if ladder, up to 11 on square 3, or
  5. slip down to snake's tail if snake there,for example slip to 8 on square 19
  6. Stay if steps are more than 25.
  7. Game over when moving to exactly square 25.
Here are my codes modified from Mac Developer Library example:


  1. // function to get dice value
  2. func dice(diceValue : Int) -> Int {
  3.    var value = diceValue
  4.    if value >= 7 {
  5.        // generate random number
  6.        drand48()
  7.        value = Int(arc4random_uniform(6) + 1)
  8.    } else {
  9.        // increment number in sequence till 7
  10.        ++value
  11.        value = value == 7 ? 1 : value
  12.    }
  13.    return value
  14. }
  15. let finalSquare = 25
  16. // Initialize array with 0s
  17. var board = [Int](count: finalSquare + 1, repeatedValue: 0)
  18. // Set jump and slip values for laders and snakes
  19. board[03] = +08; board[06] = +11; board[09] = +09; board[10] = +02
  20. board[14] = -10; board[19] = -11; board[22] = -02; board[24] = -08
  21. var square = 0
  22. var diceRoll = 0 // 0..6 for increment sequnce or > 6 for random number
  23. var step = 0
  24. print("你好,我是「茶樹油客」改寫的程序,讓我來玩遊戲吧!")
  25. gameLoop: while square != finalSquare {
  26.    step++
  27.    //diceRoll = dice(7) // random number
  28.    diceRoll = dice(diceRoll) // sequence 1-6 number
  29.    print("第\(step)步: 骰子: \(diceRoll), ", terminator: "")
  30.    switch square + diceRoll {
  31.    case finalSquare:
  32.        // diceRoll will move us to the final square, so the game is over
  33.        print("走到 \(finalSquare). \n祝賀,遊戲完成了!")
  34.        break gameLoop
  35.    case let newSquare where newSquare > finalSquare:
  36.        // diceRoll will move us beyond the final square, so roll again
  37.        print("太大, 不走")
  38.        continue gameLoop
  39.    default:
  40.        // this is a valid move, so find out its effect
  41.        square += diceRoll
  42.        square += board[square]
  43.        print("走到 \(square)")
  44.    }
  45. }

 The result is as follows:


你好,我是「茶樹油客」改寫的程序,讓我來玩遊戲吧!
第1步: 骰子: 1, 走到 1
第2步: 骰子: 2, 走到 11
第3步: 骰子: 3, 走到 4
第4步: 骰子: 4, 走到 8
第5步: 骰子: 5, 走到 13
第6步: 骰子: 6, 走到 8
第7步: 骰子: 1, 走到 18
第8步: 骰子: 2, 走到 20
第9步: 骰子: 3, 走到 23
第10步: 骰子: 4, 太大, 不走
第11步: 骰子: 5, 太大, 不走
第12步: 骰子: 6, 太大, 不走
第13步: 骰子: 1, 走到 16
第14步: 骰子: 2, 走到 18
第15步: 骰子: 3, 走到 21
第16步: 骰子: 4, 走到 25.
祝賀,遊戲完成了!


The original codes for the game are near the end in the section of Control Flow.

References


Read More...

Monday, December 14, 2015

Swift: extension and closure

TutorialPoint web site provides great information about Swift basic and syntax in a serials of sections or courses. While I was reading its content, I also tried to explore codes there with modifications.

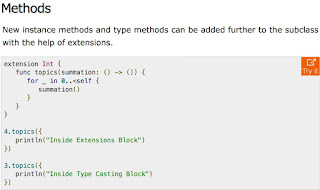
Extension and closure or block are very powerful in Swift, but they are hard to understand at the beginning. Although the description in this web tutorial explains well with simple codes, I would like to extend codes with various ways to understand those concepts in Swift.

Following is an example of codes for Int type extension with closure:


Here are my codes based on above example:


extension  Int {
    var increment: Int {return self + 2}
    func repeatBy(n : Int, message: (i: Int, v: Int) ->()) {
        for a in 0..<self {
            let r = a + n
            message(i: a, v:r)
        }
    }
}

let increment = 12.increment
print("12.increment: \(increment)")
increment.repeatBy(5) { (i, v) -> () in
    print("\(i+1) Message: \(v)")
}

The method increment is a very simple one, and I changed increment by 2.

The closure in the method of repeatBy is extended to a method with 2 parameters, and the second parameter is a closure taking two parameters. Within the closure, the first parameter, an external variable (1st parameter) and a local variable are used to call message(...) block.

The exercise codes afterwards uses print() to display a customized string with those two parameters. The result is as follows:


12.increment: 14
1 Message: 5
2 Message: 6
3 Message: 7
4 Message: 8
5 Message: 9
6 Message: 10
7 Message: 11
8 Message: 12
9 Message: 13
10 Message: 14
11 Message: 15
12 Message: 16
13 Message: 17
14 Message: 18


References


Read More...

Thursday, December 10, 2015

Play Swift on IBM Swift Sandbox

Recently I read a news about IBM creating a website for swift: IBM Swift Sandbox. That's very interesting. I went to the site and played for a while. This is a good site for beginners to write some experiment codes in web browser.

There are some examples as initials. I picked up tree.swift to put my hands on writing and playing swift codes.

The output of this example shows notes added to a tree. I wanted to extend this class so that I can print out notes in the tree.

To do that, I added a var root as property value, and a func to print tree notes. Here are my updated codes:

Here is a command to set up swift syntax in VIM

 1 
 2 /* Generic sorted tree implementation. Shows generic
 3    classes and recursive functions in Swift.
 4 */
 5 
 6 class TreeNode<T: Comparable> {
 7 
 8     var val: T?
 9     var left: TreeNode?
10     var right: TreeNode?
11     var root : Bool = true
12 
13     func printMe() {
14         if (self.root) {
15             print("  root:\(self.val!)")
16         }
17 
18         if let leftVal = self.left {
19             print("  \(leftVal.val!)<-\(self.val!)")
20             leftVal.root = false
21             leftVal.printMe()
22         }
23         if let rightVal = self.right {
24             print("  \(self.val!)->\(rightVal.val!)")
25             rightVal.root = false;
26             rightVal.printMe()
27         }
28     }
29     //add item based on its value
30     func addNode(val: T) {
31 
32         if (self.val == nil) {
33             self.val = val
34             print("Added Head")
35             return
36         }
37 
38         if (val < self.val) {
39 
40             if let left = self.left {
41               left.addNode(val)
42             } else {
43                 let newLeft = TreeNode()
44                 newLeft.val = val
45                 self.left = newLeft
46                 print("Added Left")
47             }
48         }
49 
50         if (val > self.val) {
51 
52             if let right = self.right {
53                 right.addNode(val)
54             } else {
55                 let newRight = TreeNode()
56                 newRight.val = val
57                 self.right = newRight
58                 print("Added Right")
59             }
60         }
61 
62     }
63 }
64 
65 let numbers: Array<Int> = [8, 3, 5, 2, 7, 9, 13, 16, 10, 22]
66 var root = TreeNode<Int>()
67 
68 for n in numbers {
69     print(n)
70     root.addNode(n)
71 }
72 
73 print("\nTree Notes")
74 root.root = true
75 root.printMe()
76 


Here s the result after click on Run button:


Exercises

The above codes can be extended with following 4 exercises:

  1. Add an enumeration type with three enumerators: "Added Head", "Added Left" and "Added Right".
  2. Add above enum to TreeNote class member as an note's added type, or addType.
  3. Update addNode(T) func with a return type of TreeNode, that is, the returning the added node.
  4. Add a member to TreeNode: var parent: TreeNode. Update addNode() func to set this member value.


References


Read More...

Wednesday, December 09, 2015

Back to MacVim

It has been quite a while not using VIM in my Mac. During this break, I updated my Mac OS and accounts. One thing I lost is my VIM files such as configuration and syntax settings. All those files are located in ~/ and ~/vim folders. The OS update or new account setup I did missed files in those locations.

I had to restore those settings as much as I can. I will log all I did to restore MacVIM and settings in this blog.

MacVIM Installation


MacVIM in OS 10.11.1 EI Capitan was not working. I had to reinstall it. The version I reinstalled is MacVIM 7.4 from MacUpdate website.

Since the package is not from App Store, I had to set up my System Preference security to anywhere for applications. Just to remember to set this security back to more secured one after first time running MacVIM.

Configuration


All the configuration for VIM are at HOME directory.

Fortunately I have a backup of my VIM configuration for Windows, _vimrc, on my cloud drive. I restored the file mac file to

~/.vimrc

I lost all my previous syntax configuration files. This time I am going to use VIM for swift codes. I got swift syntax file and put it at:

~/.vim/syntax/swift.vim

Here is a command to set up swift syntax in VIM

:set syntax=swift

References


Read More...