Thursday, August 17, 2017

WWDC 2017 Vedios

WWDC 2017 is over (Jun 5-9, 2017). As I did in the past years, I finally finished watching all videos of WWDC 2017 provided by Apple. There are 136 videos (49+19+15+5+4+10+15+19), each ranging from 10 minutes to over 2 hours, most around 30+ minutes. So I guess the total length of the video is about 70 hours.

Here is the list of videos I watched:

WWDC 2017

Platforms State of the Union - 102
Introducing Core ML - 703
Introducing ARKit: Augmented Reality for iOS - 602
Introducing Metal 2 - 601
Introducing Drag and Drop - 203
What's New in Swift - 402

App Frameworks

  1. Advanced Animations with UIKit - 230
  2. Advanced Touch Bar - session 222
  3. Advances in TVMLKit - 202
  4. Build Better Apps with CloudKit Dashboard - 226
  5. Building Apps with Dynamic Type - 245
  6. Building Great Document-based Apps in iOS 11 - 229
  7. Building Visually Rich User Experiences - 235
  8. Choosing the Right Cocoa Container View - 218
  9. Cocoa Development Tips - 236
  10. Connecting CareKit to the Cloud - 239
  11. Customized Loading in WKWebView - 220
  12. Data Delivery with Drag and Drop - 227
  13. Deep Linking on tvOS - 246
  14. Drag and Drop with Collection and Table View - 223
  15. Efficient Interactions with Frameworks - 244
  16. Extend Your App's Presence With Sharing - 247
  17. Extend Your App’s Presence with Deep Linking - 250
  18. File Provider Enhancements - 243
  19. Filtering Unwanted Messages with Identity Lookup - 249
  20. Focus Interaction in tvOS 11 - 224
  21. Introducing Business Chat - 240
  22. Introducing PDFKit on iOS - 241
  23. Introducing Password AutoFill for Apps - 206
  24. Localization Best Practices on tvOS - 248
  25. Making Great SiriKit Experiences - 228
  26. Mastering Drag and Drop - 213
  27. Media and Gaming Accessibility - 217
  28. Modern User Interaction on iOS - 219
  29. Natural Language Processing and your Apps - 208
  30. Now Playing and Remote Commands on tvOS - 251
  31. The Keys to a Better Text Input Experience - 242
  32. The Life of a watchOS App - 216
  33. Touch Bar Fundamentals - 211
  34. Updating Your App for iOS 11 - 204
  35. What's New in Accessibility - 215
  36. What's New in CareKit and ResearchKit - 232
  37. What's New in Cocoa - 207
  38. What's New in Cocoa Touch - 201
  39. What's New in Core Data 210
  40. What's New in Core Spotlight for iOS and macOS - 231
  41. What's New in Foundation - 212
  42. What's New in Health - 221
  43. What's New in MapKit - 237
  44. What's New in Safari View Controller - 225
  45. What's New in SiriKit - 214
  46. What's New in iMessage Apps - 234
  47. What's New in tvOS - 209
  48. What's New in watchOS 205
  49. Writing Energy Efficient Apps - 238
Design
  1. 60 Second Prototyping - 818
  2. App Icon Design - 822
  3. Communication Between Designers and Engineers - 809
  4. Design Tips for Great Games - 811
  5. Designing Across Platforms - 804
  6. Designing Glyphs - 823
  7. Designing Sound - 803
  8. Designing for Subscription Success - 814
  9. Designing for a Global Audience - 819
  10. Essential Design Principles - 802
  11. Express Yourself! - 820
  12. Get Started with Display P3 - 821
  13. How to Pick a Custom Font - 815
  14. Love at First Launch - 816
  15. Planning a Great Apple Watch Experience - 808
  16. Rich Notifications - 817
  17. Size Classes and Core Components - 812
  18. What’s New in iOS 11 - 810
  19. Writing Great Alerts - 813
Developer Tools
  1. App Startup Time: Past, Present, and Future - 413
  2. Auto Layout Techniques in Interface Builder - 412 very nice on storyboard layout!
  3. Debugging with Xcode 9 - 404
  4. Engineering for Testability - 414
  5. Finding Bugs Using Xcode Runtime Tools - 406
  6. GitHub and the New Source Control Workflows in Xcode 9 - 405
  7. Localizing Content for Swift Playgrounds - 410
  8. Localizing with Xcode 9 - 401
  9. Teaching with Swift Playgrounds - 416
  10. Understanding Undefined Behavior - 407
  11. What's New in LLVM - 411
  12. What's New in Signing for Xcode and Xcode Server - 403
  13. What's New in Swift - 402
  14. What's New in Testing - 409
  15. What’s New in Swift Playgrounds - 408
Distribution
  1. Advanced StoreKit - 305
  2. Introducing the New App Store - 301
  3. What's New in Device Configuration, Deployment, and Management - 304
  4. What's New in StoreKit - 303
  5. What's New in iTunes Connect - 302
Featured
  1. Convenience for You is Independence for Me - 110
  2. From Monroe to NASA - 106 - NA yet
  3. Platforms State of the Union - 102
  4. WWDC 2017 Keynote - 101
Graphics and Games
  1. From Art to Engine with Model I/O -610
  2. Going Beyond 2D with SpriteKit - 609
  3. Introducing ARKit: Augmented Reality for iOS - 602
  4. Introducing Metal 2 - 601
  5. Metal 2 Optimization and Debugging - 607
  6. SceneKit in Swift Playgrounds - 605
  7. SceneKit: What's New - 604
  8. Using Metal 2 for Compute - 608
  9. VR with Metal 2 - 603
  10. What's New with Screen Recording and Live Broadcast - 606
Media
  1. Advances in Core Image: Filters, Metal, Vision, and More -510
  2. Advances in HTTP Live Streaming - 504
  3. Apple Podcasts - 512
  4. Capturing Depth in iPhone Photography - 507
  5. Error Handling Best Practices for HTTP Live Streaming - 514
  6. HLS Authoring Update - 515
  7. High Efficiency Image File Format - 513
  8. Image Editing with Depth - 508
  9. Introducing AirPlay 2 - 509
  10. Introducing HEIF and HEVC - 503
  11. Introducing MusicKit - 502
  12. Vision Framework: Building on Core ML - 506
  13. What's New in Audio - 501
  14. What's New in Photos APIs - 505
  15. Working with HEIF and HEVC - 511
System Framework
  1. Accelerate and Sparse Solvers - 711
  2. Advances in Networking, Part 1 - 707
  3. Advances in Networking, Part 2 - 709
  4. Best Practices and What’s New in User Notifications - 708
  5. Core ML in depth - 710
  6. Creating Immersive Apps with Core Motion - 704
  7. Developing Wireless CarPlay Systems - 717
  8. Enabling Your App for CarPlay - 719
  9. Introducing Core ML - 703
  10. Introducing Core NFC - 718
  11. Modernizing Grand Central Dispatch Usage -706
  12. Privacy and Your Apps - 702
  13. What's New in Apple Pay & Wallet - 714
  14. What's New in Core Bluetooth - 712
  15. What's New in HomeKit - 705
  16. What's New in Location Technologies - 713
  17. What's new in Apple File System - 715
  18. Your Apps and Evolving Network Security Standards - 701
  19. iOS Configuration and APIs for Kiosk and Assessment Apps - 716

References


Read More...

Friday, August 04, 2017

Self-reference and clousure

Here is a great short video explaining reference type and how to properly use it in closure by Brain's How to Build That App in YouTube.


Read More...

Wednesday, June 28, 2017

TestFlight for iOS Developers and Testers

TestFlight is an app provided by Apple. Here is the description by Apple about it:

TestFlight makes it easy to invite users to test your apps and collect valuable feedback before you release them on the App Store. You can invite up to 2,000 testers using just their email address.


Recently I have been using TestFlight app to deliver my app to testers. I found that this is a great platform between iOS app developers and app testers.

Add Testers by email

To make an app available for iOS users/testers to install and to test the app on their iOS devices, what an app developer needs to do is to request email from testers.

Then the developer adds the email to developer's test list from Apple iTunes Connect account. Tester will receive an email about test request.

From my experience, testers should first install TestFlight app from App Store on their iOS devices. This will make it easier to click or tap on the request email and see the app in TestFlight right away. Otherwise, testers will have to enter redeem code from the request test email.


Using TestFlight

Even though testers could open app directly on their iOS devices after initial installation, I would recommend to launch or open app each time from TestFlight. One of advantages is that testers will get the latest version from there. From TestFlight testers would notice new upgrades if the version of app is old.


From TestFlight, testers are able to see and install all previous versions, as well as description provided by developers. Tap on an app will provide more information about the app, information, Previous Builds, and more. This provides a convenient way to compare, verify and test issues found in the app.


If app is installed through TestFlight on one iOS device, the tester can also install the same app on other iOS devices (iPhone or iPad) by using the same AppleID, and then continue to his/her test on various iOS devices.

Send Feedback to Developers

TestFlight provides “Send Feedbacks” as a way to communicate with developer. The feedback is sent out by email. Therefore you can attach additional information such as screenshots, notes, and any related information. To add attachment in email, tap and hold on email body. Then a popup menu will show options to add photos.


I would strongly recommend testers sending at least one feedback to developer, even none issues are found. This will let developer know at least what iOS devices testers are using.

Welcome More Testers

Anyone with iOS devices 9.3 or higher are welcome to test my app, TapToCount - When, Where & What. What you need to do is to pass me your email. I will add you in my tester list.

As mentioned before, please install TestFlight app from App Store first. Then open TestFlight with your Apple ID.

One thing I notice is that you need to have Wifi or Cellular connection when you use TestFlight. It will connect to Apple server to find out what apps are available for your TestFlight. This will cost very small data communication. To install or update app, Wifi connection is recommended if data is concern for you.

You will receive test request by email for the first time. Tap on the link in email on your iOS device. You will see my app in TestFlight ready for installation. As my recommendation, open my app from TestFlight easy time. This will guarantee you will test my App in the newest version.

Keep in mind, there is 90 days expiration to use/test app through TestFlight. During your test period, please send me at least one of you test results, comments and any bugs or crashes you found.

References


Read More...

Wednesday, May 10, 2017

Apple Developer

Today is an important date for me. I just applied my Apple Developer from Apple web site. Actually I have been Apple Developer for long time, but I have not paid my annual fee as former developer yet. Even so, I have been doing development since the start of iPhone released. Now my app is ready for Apple Store.

The application process is very simple. First, submit my request from the web site. I applied as an company. What I need to get D&B's DUNS number for my company. This can be obtained for free from D&B Canada. Normally it requires 30 days to process. Another requirement is an email. The email cannot be gmail, hotmail, yahoo, or the likes. The recommended is email with company's domain name. I found that iCloud email is acceptable.

After submitting my request, I receive an email about acceptance. The next step is to agree Apple Developer Program License Agreement.

The last step is to pay my annual fee $99US or $119CAD, plus tax 5.95.

Within one hour after my annual fee payment, I am not registered developer for all Apple platform apps. The first three things I have to do are prompt when I login to my developer's account:


  • Connect to my team members (none so far)
  • Get Certificates which will be used for my apps
  • and set up iTunes connect account to manage my apps,


References


Read More...

Monday, May 08, 2017

Workspace in Xcode

One of interesting things I learned from Developing Apps for iOS CS193P, by Stanford U, is using Workspace in Xcode. This was explained in detail in lecture 9, TableView, at about 46minute.


Follow the instruction, what I did in my app project is to convert my project to Workspace from menu File-Save as Workspace...

Then from Finder to locate another project file and drag it to the Workspace, as two parallel projects.

One of project is a iOS Target type. This target has to be added to another project as embedded binary in project. This can be done by dragging the target to project settings.

The advantage of Workspace is that I can modify both project if needed.

Read More...

Thursday, May 04, 2017

Xcode and Swift Tips and Tricks

During my development of my iOS app, I have encountered some hurdles. Even though some of them are small ones, I did spend a lots of time to find solution to overcome them. Here are some in my past short period.

Can't find customized class from Storyboard


Normally customized view controller classes are used to handle specific requirement for some views. In Storyboard, this customized class can be specified in Storyboard right property panel "Show the identity inspector" tab.

For whatever reason, I may pressed space bar by chance in the area of Module. This caused the Module's value as None! As a result, I got this run time error:

Could not cast value of type 'UIViewController' (0x113f1b798) to 'MyProject.MyViewController' (0x113985200).

I spent hours trying to figure out why. Eventually, I found out the simple solution: change the module to my project.

This is what I had in my Storyboard for this customized class setting:


Hide Tabbar and use toolbar


In a tabar driven app, sometimes, I may need to hide tabbar and show a toolbar as alternative. To hide tabar for next view controller, it can be done in prepare(for segue: sender:) event.

  1. override func prepare(for segue: UIStoryboardSegue, sender: Any?) {
  2.  ...
  3.  let vc = segue.destination
  4.  // call vc's hidebottombar
  5.  vc.hidesBottomBarWhenPushed = true
  6.  ...
  7. }

For the case of normal view controller, bar button item can be directly added to the bottom of the view. For the case of tableview controller, in order to show bar button item on the bottom, a toolbar has to be used to encapsulate bar button items. This can be done in storyboard.

However, it seems that there is no API or method to let vc to show or hide toolbar. At first, I found a solution to show or hide toolbar by adjusting toolbar y position in viewWillAppear event. The problem is that if user changes device from portrait to landscape, the toolbar will be off screen, disappeared. As a result, I have to adjust toolbar y position in the event of viewRotated.

To adjust toolbar y position, I add the following API to view controller as extension. This makes it easier in call this API to show toolbar.

  1. extension UIViewController {
  2.  func setToolBarShow(show: Bool, delay: Double = 2) {
  3.    if let toolbar = self.navigationController?.toolbar {
  4.      let newOriginY = UIScreen.main.bounds.height - toolbar.bounds.size.height
  5.      if toolbar.frame.origin.y != newOriginY {
  6.        toolbar.frame.origin.y = newOriginY
  7.      }
  8.      if delay > 0 {
  9.        // Make sure origin is set correctly
  10.        DispatchQueue.main.asyncAfter(deadline: .now() + delay) {
  11.          if toolbar.frame.origin.y != newOriginY {
  12.            toolbar.frame.origin.y = newOriginY
  13.          }
  14.        }
  15.      }
  16.    }
  17.  }
  18. ...
  19. }

Here the trick to show toolbar in the events of viewDidAppeared and viewRotated is to delay adjusting toolbar y position. It seems that in both events, without delay, toolbar would not show. It may be something inside UIKit would not seeing this adjustment. With delay, the toolbar would show correctly at the bottom of the view.

Change navigation back button's title


In the case of parent VC to child VC by using navigation controller, the top-left button is used to pop off child VC and back to parent VC. The title of this button is by default the title of the parent VC. If the parent title is too long, it may make top text too crowded if the title of child VC is too long. One simple way to change top-left button title to "Back". This can be done by clearing parent title before pushing to child VC. UIKit will automatically use "Back" as the title.

Here is the solution to do that: clear view's title when pushing a new view controller. This can be done in the event of prepare() for segue.

One thing to remember is that to set view's title on the event of viewDidAppear(), otherwise, the view's title would be blank if the view is pushed back.

Resources


Read More...

Friday, April 28, 2017

Custom Store URL for CoreData

Recently I watched Developing iOS Apps with Swift by Stanford U, which was released in iTunes U on Jan 24, 2017. Even this course is for beginners, I still found many new concepts about iOS 10. One of the most interesting thing is about CoreData.

I tried to incorporate the new strategy strongly recommend by Paul Hegarty (instructor) in my App. Soon I realized that many new classes or methods by this strategy are only for devices in iOS 10.*. My app is for pre iOS 10 as well. After some consideration, I decided to use this strategy anyway. For pre iOS 10 cases, I'll continue to use UIManagedDocument to load CoreData database.

My app uses a customized store URL for loading data from CoreData database. The database is located in app's Documents folder. I added the new strategy into my project and tried to use the same URL to load database. To my surprise, my previous database are gone when I run the project in Simulator.

After deep investigation into where the SQLite database is, I found that the URL used by UIManagedDocument is actually pointing to the SQLite database two levels of directories down.


In above example, the URL by UIManagedDocument is defaultDatabase, but the SQLite database is persistentStore, under the directory of defaultDatabase/storeContent. However, the URL used by the new strategy, i.e., NSPersistentContainer, is the URL directly pointing to the SQLite database, persistentStore.

Actually, the first time I tried to load my database by previous URL caused my project crashing. As I discovered above, the URL pointing to defaultDatabase, which is a folder name.

This presents an issue for my app. Some users's device may be pre iOS 10. If they update their device to iOS 10.*, my app has to be able to adjust the previous URL to the correct database, so that users would not lose their data.

After some changes, my app can deal with this transition smoothly without losing their data.

This is a very good experience, incorporating new and efficient strategies into my app and dealing with prior iOS 10 devices.

References


Read More...

Saturday, March 04, 2017

Localization Experience in Swift Project

When I tried to jump into localization for my app, I thought it would be a simple job. Actually, I have encountered several hurdles during this progress. Here I would like to make some notes about issues I had experienced.

Bomb! Unexpected Exception


I started to add supporting to two sets of Chinese(my native language): mainly string files such as .strings, and .stringsdict files. This can be done by clicking on Localization button on the right Utilities panel in Xcode. By enabling localization, Xcode would move the English string or plist file from project root into en.lproj folder, and creating other language folders for localized resources, for example, zh-Hant.lproj for Simplified Chinese.

One thing I noticed is that plist file also has Localization section in Xcode right Utilities panel. I thought this could be localized and I did see some settings in some plist file requiring localization. Then I tried to localize plist file together. That's a mistake. See the following sections.


I have a long list of resource files. I spent about 2 days to finish localization for my project. With all the resource files ready, I stared to compile my project and tried to start my test on Simulator. Bomb! I saw this exception right away.


That's really bizarre exception. What does it mean by "Invalid argument"? It does not provide any detail clue about the exception. I had to try internet search to find out if any other people experienced the same issue.

No Solutions Anywhere


Soon I found out this is a common issue for some Swift developers and some suggestions were provided. Unfortunately, I tried all the solutions provided, but I could not resolve this exception in my case. Two days passed, I was really in struggle stage and with no clue to fix the issue.

With no way to get out, I stood back for a moment. With so many changes in my codes, I might mess up somewhere in my project. Instead of finding a way out of the maze, what I could do is to move my project back to the previous working version and redo the localization again. This was the last and difficult choice because I did not want to give up my localization effort.

Roll Back to Previous Working Version


I decided to discard all the changes in my codes from Source Control (fortunately, I have kept doing source code repository by using Xcode Source Control feature) and rolled back to previous version. This time, I started to do one change, and then compiling my project and running my app on Simulator at a time. In this way, I could figure out where the exception would be. I was also very careful coding localization to avoid any error causing unnecessary changes in my project.

I started from my app's settings, i.e, my app name, location privacy description, and app settings, where some localizations are required. I was so lucky that I soon located the issue which caused the exception.

Don't Localize info.plist


[app_name]-info.plist is a project property file, where project settings specific to my app are defined. For simplification, I call this info property file as info.plist in this blog. I need to localize my app display name and location privacy description in this plist.

In Xcode, all string files and plist files can be localized by clicking on Localize... button in Localization section on right Utilities penal.


When a resource file is localized, the English version file is moved from project root to en.lproj folder, and other localized files are created under corresponding language folders, for example, zh-Hans.lproj is the folder for Simplified Chinese resource files.

The problem is that info.plist file would be missing from project root if it were localized. The compile and installation processes require info.plist at project root. Actually, there is a resource file infoPlist.strings for info.plist localization purpose!

To verify this, I discard my changes again. For my working version, I found Identify section in my project settings (select my app as target, in General tab):


However, the same setting would be like as follows if the info.plist is localized.


Even I tried to locate the info.plist file from Choose button, I could not locate it from the dialog window.


Don't Localize Plist?


While I am writing this blog, I realize that none of plist files in my project require localization directly. Further exploration of the APIs Apple provides for localization, all strings files are automatically localized without any reference to device local settings from API interface calls. However, to load a plist, it seems that you have to specify a path for the plist file.

I remember that when I initially added a localization language to my project, from Info tab in project settings:


I saw a prompt dialog for adding new language for only two items: infoPlist.strings, which is for info.plist, and MainStoryboard.storyboard.


For info.plist file, Xcode provides corresponding infoPlist.strings file for localization. In my project, another place where a plist file is used is for my app default settings.

Localization of App Default Settings


The app default settings are defined in a bundle file: Settings.bundle, where a plist file Root.plist, which for default settings, and an English localization strings file within en.lproj folder, are created by Xcode at the time when the project was initially created.


To localize default settings for another language, a language folder and strings file have to be created manually(as in above zh-Hans.lproj and zh-Hant.lproj). The reason is that the plist file and strings files are within the bundle file and there is no Localization section in the right Utilities panel for adding new languages.

I found out that in order for settings working for any other languages, do not remove one item in Root.plist file: Strings Filename and its value as Root.


I had trouble to make default settings working while I was making changes in Root.plist file. I did not understand the usage of that item and removed it from the plist when I tried to clean up default settings. I was tumbled by this mistake. Anyway, it is a good experience and I now fully understand its importance.

References


Read More...

Friday, February 24, 2017

Enable Localization for Swift Project

My app is closing to finish stage. One feature I would like to have is to enable localization. Spending about hours exploration, I found the way to enable localization for my Swift project in Xcode 8.2.1.

The localization has to be set at project level. Open project settings first. Enable level panel and make sure to select project, you will find Localization section in Info section.

Then press + to add languages you like to support.


After this feature enabled, you may get prompt to enable localization for string, default plist and other localizable items. You can also click on Localizations in high panel for some resource files to add localization.

Read More...

Monday, November 07, 2016

Playground and Testing Subquery by NSExpression (3)

In order to apply more than one fetch conditions on each of a subset property, I think that I can still use Subquery to do that. For my test example, friends property is a collection and it can be used as the first parameter in a Subquery. In this way, the predicate, the third parameter in the Subquery, can apply more than one fetch conditions on each friend.

Nested Subquery


Fortunately, it is possible to build a nested Subquery expression. The result of a Subquery is an array(may be empty). By using NSExpression's function count, the second or nested Subquery can be placed in a Subquery expression's third parameter predicate: Subquery(...).@count > 0 as an example.

Thereafter, it comes my nested Subquery test:

TestSubquery.TestNestedSubquery(nameContains: "L", birthYearLowLimit: 2010, friendsLevel: 1)

and the result is as follows:

  1. Creating Person object and friends...
  2. Person - name: Bob, birthYear: 1997
  3.    Friend - name: Tony, birthYear: 2010, friends: (none)
  4.    Friend - name: Lisa, birthYear: 2012, friends: (none)
  5. Collection expression: {<MyPlayground_Sources.Person: 0x618000070700>}
  6. Collection expression result value: (
  7.    "<MyPlayground_Sources.Person: 0x618000070700>"
  8. )
  9. Person - name: Bob, birthYear: 1997
  10. Predicate: SUBQUERY($x.friends, $y, $y.name CONTAINS "L" AND $y.birthYear > 2010).@count > 0
  11. Subquery Expression: SUBQUERY({<MyPlayground_Sources.Person: 0x618000070700>}, $x, SUBQUERY($x.friends, $y, $y.name CONTAINS "L" AND $y.birthYear > 2010).@count > 0)
  12.  collection: {<MyPlayground_Sources.Person: 0x618000070700>}
  13.  variable: x
  14.  predicate: SUBQUERY($x.friends, $y, $y.name CONTAINS "L" AND $y.birthYear > 2010).@count > 0
  15. Subquery expression result value: Optional(<__NSArrayM 0x60800005f8f0>(
  16. <MyPlayground_Sources.Person: 0x618000070700>
  17. )
  18. )
  19. Subquery expression value as [Person]: [<MyPlayground_Sources.Person: 0x618000070700>] as follows
  20. Person - name: Bob, birthYear: 1997
  21.    Friend - name: Tony, birthYear: 2010, friends: (none)
  22.    Friend - name: Lisa, birthYear: 2012, friends: (none)

It is so fun to test Subquery in Playground!

One-to-many Relationships to More Than One Levels


With above knowledge about Subquery expression, we may use powerful Subquery expression to go to deep more than one level of one-to-many relationships. For example, we may query persons with constrains on the second level of friends, i.e., friends' friends.

TestSubquery.TestNestedSubquery(aggregate: .none, nameContains: "a1", checkFriendsNull: true, friendsLevel: 2)

The above test applies aggregate operator NONE on the second level friends property of person Bob, i.e., friends' friends. Here are printed out debug information, as-expected:

  1. Creating Person object and friends...
  2. Person - name: Bob, birthYear: 1997
  3.    Friend - name: Tony, birthYear: 2010
  4.      Friend - name: Tony1, birthYear: 2012, friends: (none)
  5.      Friend - name: Lisa1, birthYear: 2011, friends: (none)
  6.    Friend - name: Lisa, birthYear: 2012, friends: (none)
  7. Collection expression: {<MyPlayground_Sources.Person: 0x60000007fa00>}
  8. Collection expression result value: (
  9.    "<MyPlayground_Sources.Person: 0x60000007fa00>"
  10. )
  11. Person - name: Bob, birthYear: 1997
  12. Predicate: SUBQUERY($x.friends, $y, $y.friends != nil AND (NOT ANY $y.friends.name CONTAINS "a1")).@count > 0
  13. Subquery Expression: SUBQUERY({<MyPlayground_Sources.Person: 0x60000007fa00>}, $x, SUBQUERY($x.friends, $y, $y.friends != nil AND (NOT ANY $y.friends.name CONTAINS "a1")).@count > 0)
  14.  collection: {<MyPlayground_Sources.Person: 0x60000007fa00>}
  15.  variable: x
  16.  predicate: SUBQUERY($x.friends, $y, $y.friends != nil AND (NOT ANY $y.friends.name CONTAINS "a1")).@count > 0
  17. Subquery expression result value: Optional(<__NSArrayM 0x618000059fb0>(
  18. )
  19. )
  20. Subquery expression value as [Person]: [] as follows

empty array because none of friends' friends Lisa1 contains "a1".

Updates


Important findings! Recently (2017.02.21) I found an issue or restriction with Subquery. All the objects in Subquery have to be key-value-coding-compliant, that is, all the objects have to be based on NSObject.

In other words, object from none NSObject based class such as struct would cause exception or crash when calling method expressionValue(with: context:). Subquery would not be able to figure out any methods without implementing key-value-observation(KVO) protocol. I spent almost more than one day to figure this issue out.

Resources


Read More...

Wednesday, October 26, 2016

Playground and Testing Subquery by NSExpression (2)

My next test is to use Subquery expression to test a one-to-many case. A person may have some friends. My search is to find a person whose friends at least one's birth year is greater than 2011. For this case, the operator any can be used. I have defined an aggregation enumerate type for using operators:

  1. public enum AggregateType: String {
  2.  case any = "any"
  3.  case all = "all"
  4.  case none = "none"
  5. }

By the way, I found in my test that in Subquery, the operator NONE is actually NOT ALL.

One-to-many Relationship Test


Here is my test in Playground:

TestSubquery.TestSubquery(aggregate: .any, birthYearLowLimit: 2011, friendsLevel: 1)

One of Bob's friend Lisa was born in the year of 2012. Therefore, the expected result Bob is found:

  1. Creating Person object and friends...
  2. Person - name: Bob, birthYear: 1997
  3.    Friend - name: Tony, birthYear: 2010, friends: (none)
  4.    Friend - name: Lisa, birthYear: 2012, friends: (none)
  5. Collection expression: {<MyPlayground_Sources.Person: 0x600000262040>}
  6. Collection expression result value: (
  7.    "<MyPlayground_Sources.Person: 0x600000262040>"
  8. )
  9. Person - name: Bob, birthYear: 1997
  10. Predicate: ANY $x.friends.birthYear > 2011
  11. Subquery Expression: SUBQUERY({<MyPlayground_Sources.Person: 0x600000262040>}, $x, ANY $x.friends.birthYear > 2011)
  12.  collection: {<MyPlayground_Sources.Person: 0x600000262040>}
  13.  variable: x
  14.  predicate: ANY $x.friends.birthYear > 2011
  15. Subquery expression result value: Optional(<__NSArrayM 0x600000055240>(
  16. <MyPlayground_Sources.Person: 0x600000262040>
  17. )
  18. )
  19. Subquery expression value as [Person]: [<MyPlayground_Sources.Person: 0x600000262040>] as follows
  20. Person - name: Bob, birthYear: 1997
  21.    Friend - name: Tony, birthYear: 2010, friends: (none)
  22.    Friend - name: Lisa, birthYear: 2012, friends: (none)

I tested other two operators(all and none). The results are all empty array(of Person). That's expected.

Need to Check Friends Collection?


What happens if Bob has no friends? I thought. I immediately did the following test with friendsLevel to 0:

TestSubquery.TestSubquery(aggregate: .any, birthYearLowLimit: 2011, friendsLevel: 0)

The result is as expected, empty array. However, to my surprise, I got Bob in an array of [Person] for both ALL and NONE operators:

  1. Creating Person object and friends...
  2. Person - name: Bob, birthYear: 1997
  3. Collection expression: {<MyPlayground_Sources.Person: 0x60000006aec0>}
  4. Collection expression result value: (
  5.    "<MyPlayground_Sources.Person: 0x60000006aec0>"
  6. )
  7. Person - name: Bob, birthYear: 1997
  8. Predicate: ALL $x.friends.birthYear > 2011
  9. Subquery Expression: SUBQUERY({<MyPlayground_Sources.Person: 0x60000006aec0>}, $x, ALL $x.friends.birthYear > 2011)
  10.  collection: {<MyPlayground_Sources.Person: 0x60000006aec0>}
  11.  variable: x
  12.  predicate: ALL $x.friends.birthYear > 2011
  13. Subquery expression result value: Optional(<__NSArrayM 0x60000005e960>(
  14. <MyPlayground_Sources.Person: 0x60000006aec0>
  15. )
  16. )
  17. Subquery expression value as [Person]: [<MyPlayground_Sources.Person: 0x60000006aec0>] as follows
  18. Person - name: Bob, birthYear: 1997

I am not sure if this is a bug in Subquery. Still I don't know how the implementation is done within the predicate. To guarantee the result is correct, I think that further checking if friends being nil is needed. My tests are updated with additional parameter to check friends so that the predicate contains checking if friends being nil.

TestSubquery.TestSubquery(aggregate: .all, birthYearLowLimit: 2011, checkFriendsNull: true, friendsLevel: 0)

The test result is prefect, as-expected if checkFriendsNull parameter is set to true. All tests for other two operators are also correct.

  1. Creating Person object and friends...
  2. Person - name: Bob, birthYear: 1997
  3. Collection expression: {<MyPlayground_Sources.Person: 0x618000069200>}
  4. Collection expression result value: (
  5.    "<MyPlayground_Sources.Person: 0x618000069200>"
  6. )
  7. Person - name: Bob, birthYear: 1997
  8. Predicate: $x.friends != nil AND ALL $x.friends.birthYear > 2011
  9. Subquery Expression: SUBQUERY({<MyPlayground_Sources.Person: 0x618000069200>}, $x, $x.friends != nil AND ALL $x.friends.birthYear > 2011)
  10.  collection: {<MyPlayground_Sources.Person: 0x618000069200>}
  11.  variable: x
  12.  predicate: $x.friends != nil AND ALL $x.friends.birthYear > 2011
  13. Subquery expression result value: Optional(<__NSArrayM 0x608000056b30>(
  14. )
  15. )
  16. Subquery expression value as [Person]: [] as follows

More on One-to-many Relationship Test


The above test has only one condition on friends' birthYear property. How about to add one more condition on property name containing something?

Here is a test with two conditions:

TestSubquery.TestSubquery(aggregate: .any, nameContains: "T", birthYearLowLimit: 2011, checkFriendsNull: true, friendsLevel: 1)

The result of the test is as follows:

  1. Creating Person object and friends...
  2. Person - name: Bob, birthYear: 1997
  3.    Friend - name: Tony, birthYear: 2010, friends: (none)
  4.    Friend - name: Lisa, birthYear: 2012, friends: (none)
  5. Collection expression: {<MyPlayground_Sources.Person: 0x60800007f5c0>}
  6. Collection expression result value: (
  7.    "<MyPlayground_Sources.Person: 0x60800007f5c0>"
  8. )
  9. Person - name: Bob, birthYear: 1997
  10. Predicate: $x.friends != nil AND ANY $x.friends.name CONTAINS "T" AND ANY $x.friends.birthYear > 2011
  11. Subquery Expression: SUBQUERY({<MyPlayground_Sources.Person: 0x60800007f5c0>}, $x, $x.friends != nil AND ANY $x.friends.name CONTAINS "T" AND ANY $x.friends.birthYear > 2011)
  12.  collection: {<MyPlayground_Sources.Person: 0x60800007f5c0>}
  13.  variable: x
  14.  predicate: $x.friends != nil AND ANY $x.friends.name CONTAINS "T" AND ANY $x.friends.birthYear > 2011
  15. Subquery expression result value: Optional(<__NSArrayM 0x618000051af0>(
  16. <MyPlayground_Sources.Person: 0x60800007f5c0>
  17. )
  18. )
  19. Subquery expression value as [Person]: [<MyPlayground_Sources.Person: 0x60800007f5c0>] as follows
  20. Person - name: Bob, birthYear: 1997
  21.    Friend - name: Tony, birthYear: 2010, friends: (none)
  22.    Friend - name: Lisa, birthYear: 2012, friends: (none)

The result seems correct, however, Bob's friend Tony was born in 2010, and another friend Lisa was born in 2012. If you look carefully at the logic of Subquery's predicate, the fetch conditions are done by ANY operator on friends subset separately, i.e., checking only on name on friends, and then only birth year on friends. It does not mean one of friends whose both name and birth year meet fetch conditions.

In my next blog, I'll continue to talk about how to find out that at least one of friend's both properties meed fetch requirement.

Resources


Read More...

Monday, October 24, 2016

Playground and Testing Subquery by NSExpression (1)

I am not sure when Playground was introduced to Xcode, may version 2? I started to use Playground when I moved to Xcode 3. As I mentioned in my previous blog, I would like to find out a better way to test Subquery.

It is very easy to add a Playground in iOS project in Xcode. However, it is hard to test CoreData in Playground. First, CoreData model is not easy to add to Playground, even though I eventually found a way to add CoreData context to Playground. Next difficulty is that I still cannot fig out how to add CoreData managed data classes to Playground. It seems that namespace between my project and Playground are different. I could change all my managed classes to public, but they are not visible nor accessible through CoreData fetch mechanism.

My purpose is to test Subquery. When I found out that Subquery can be built in NSExpression, I immediately think about Playground as a place to do my test.

Playground in Xcode


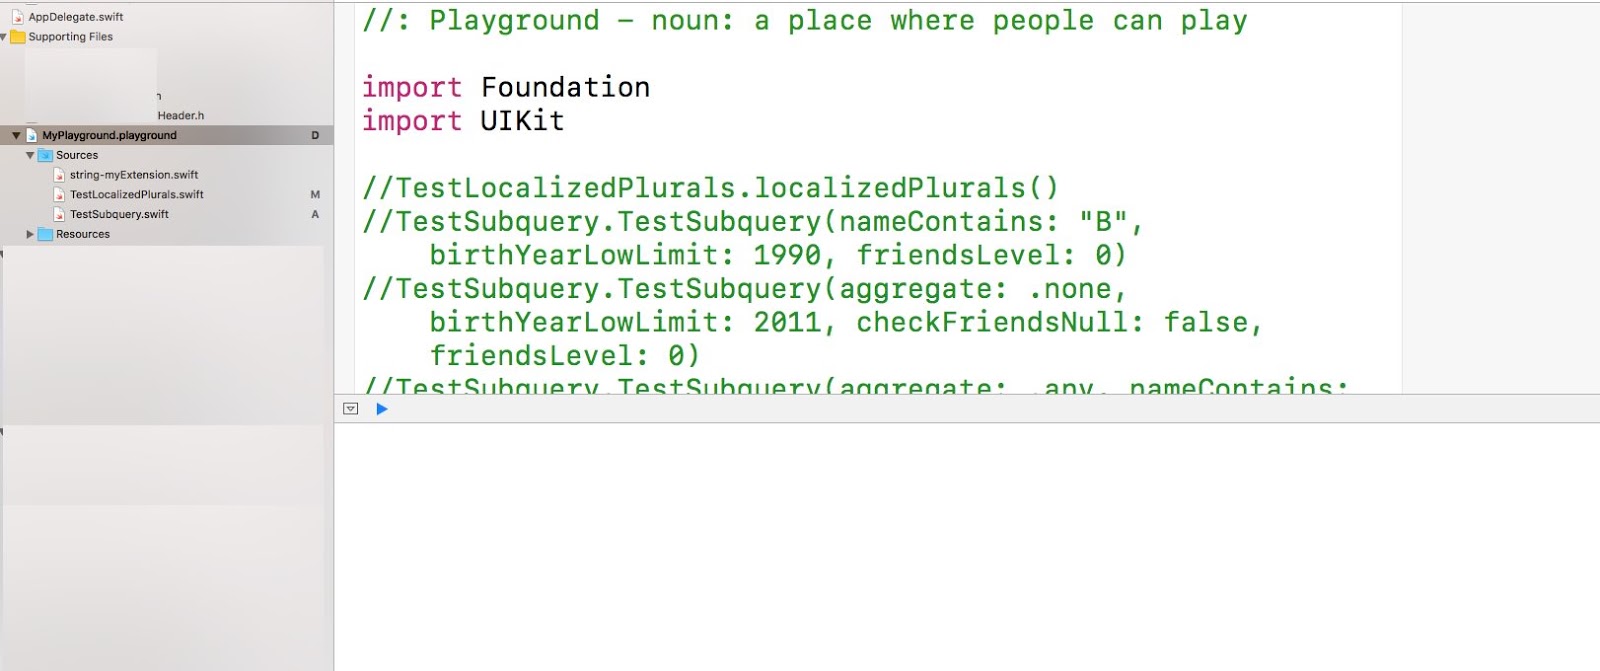
To add a Playground to Xcode project is very simple: just add a new file to Xcode project and then select Playground. By default, it is called as MyPlayground. There are two folders within the Playground: Sources for all swift source codes, and Resources for resource files.

The following is MyPlayground in Xcode left panel Project navigator view.


On the right panel, the left area on the top is an editable area for swift codes. The right side on the top is an area for immediate result view and the bottom is debug result view.


It is better to organize all the classes, extensions, enumerations and types in swift files under Sources folder. In order to access them from Playground, all the accessible elements have to be public.

During your start test stage, you may need to place all your classes and variables, types, and functions in Playground. In this way, any run-time errors would be highlighted during your test. When all those elements are OK, you can move them to a swift file under Sources folder.

Test Class


As I mentioned in my previous blog, the first parameter in Subquery is a collection of objects, defined by a class. What I found that there are some requirement for the class. First, the class has to inherit from NSObject which has hash code for equality. Secondly, if you need to use operator ALL, ANY, or NONE on collection properties defined in the class, the collection has to be NSSet type.

For my test, I defined the following Person class.

  1. public class Person : NSObject {
  2.    public var name: String
  3.    public let birthYear: Int
  4.    public var friends: NSSet?
  5.    init(name pName: String, birthYear year : Int) {
  6.        name = pName
  7.        birthYear = year
  8.        super.init()
  9.    }
  10. }

I created a swift file TestSubquery.swift in Sources folder. The Person class is defined there. This class is perfect data for Subquery's first parameter: collection. The class has two simple properties name and birthYear, and one collection property friends. In my test, only one person object is created and placed in an array as collection, which is used as the first parameter in Subquery.

friends property is optional NSSet type collection, where actually Person objects are hold or null if no objects. Each person in friends could have friends. In this way, nested friends could be used as many levels of one-to-many relationship for testing. The following is my help function(in TestSubquery.swift file as a module function) to create base data for my tests. The function takes one parameter to control levels of nested friends. I'll explain how to use this parameter to do some interesting tests later.

  1. func getPerson(friendsLevel: Int) -> [Person] {
  2.    print("Creating Person object and friends...")
  3.    let p = Person(name: "Bob", birthYear: 1997)
  4.    if friendsLevel > 0 {
  5.        let p1 = Person(name: "Tony", birthYear: 2010)
  6.        if friendsLevel > 1 {
  7.            let p1_1 = Person(name: "Tony1", birthYear: 2012)
  8.            if friendsLevel > 2 {
  9.                 let p1_1_1 = Person(name: "Tony1_1", birthYear: 2011)
  10.                 let p1_1_2 = Person(name: "Tony1_2", birthYear: 2012)
  11.                 p1_1.friends = NSSet(objects: p1_1_1, p1_1_2)
  12.            }
  13.            let p1_2 = Person(name: "Lisa1", birthYear: 2011)
  14.            p1.friends = NSSet(objects: p1_1, p1_2)
  15.        }
  16.        let p2 = Person(name: "Lisa", birthYear: 2012)
  17.        p.friends = NSSet(objects: p1, p2)
  18.    }
  19.    printPerson(personCollection: [p], printFriends: true)
  20.    return [p]
  21. }

Here is the complete debug information of person data structure (up to 2 levels of nested friends):

  1. Creating Person object and friends...
  2. Person - name: Bob, birthYear: 1997
  3.    Friend - name: Tony, birthYear: 2010
  4.      Friend - name: Tony1, birthYear: 2012
  5.        Friend - name: Tony1_2, birthYear: 2012, friends: (none)
  6.        Friend - name: Tony1_1, birthYear: 2011, friends: (none)
  7.      Friend - name: Lisa1, birthYear: 2011, friends: (none)
  8.    Friend - name: Lisa, birthYear: 2012, friends: (none)


In addition to that, I have added some other types and help functions, as well as a test class TestSubquery. Here I don't need to list all the codes for them. Only test codes will be provided and explained in the following sections.


The complete source code can be downloaded from a link in Resources section.

Test Structure


Subquery NSExpression will be used as an expression object for my tests. To build a Subquery expression, two things have to be prepared: a collection data or expression and a predicate. Therefore, all my tests are defined in the following structure or steps:


  1. get an expression of Person collection,
  2. create a predicate, and
  3. build a Subquery expression, finally evaluate the Subquery expression to get result.

Step 1 is very simple. The collection of Person is obtained from the function getPerson(...) as explained above. In step 2, a predicate is created by one of a list of help functions, which define interested fetch query conditions against to the collection of Person. Finally, it is time ready to build a Subquery expression and then to evaluate its result in step 3.

Let's look at a simple test func defined in TestSubquery class.

  1. public class TestSubquery {
  2. ...
  3.  public static func TestSubquery(nameContains: String, birthYearLowLimit: Int, friendsLevel: Int = 2) {
  4.    let e = getColletionExpression(friendsLevel: friendsLevel)
  5.    let predicate = getPredicate(nameContains: nameContains, birthYearLowLimit: birthYearLowLimit)
  6.    let expValue = getSubqueryExpressionResult(collection: e, predicate: predicate)
  7.    printSubqueryExpressionWith(result: expValue)
  8.  }
  9. ...
  10. }

At line 4, only one person with a name, birth year and a collection of friends (or null if no friends) is created as collection expression by the help func of getCollectionExpression. At line 5, a predicate with CONTAINS(string) function for name and low limit for birth year is obtained from the help func of getPredicate. With the data collection and predicate ready, at line 6, the help func of getSubqueryExpressionResult builds a Subquery expression and evaluates the result.


Test and Result


To better understand my test, extensive information are printed out in debug window. Here is one example of using above test func in Playground:

TestSubquery.TestSubquery(nameContains: "L", birthYearLowLimit: 2010, friendsLevel: 0)

and the debug information is as follows:

  1. Creating Person object and friends...
  2. Person - name: Bob, birthYear: 1997
  3. Collection expression: {<MyPlayground_Sources.Person: 0x60800007e940>}
  4. Collection expression result value: (
  5.    "<MyPlayground_Sources.Person: 0x60800007e940>"
  6. )
  7. Person - name: Bob, birthYear: 1997
  8. Predicate: $x.name CONTAINS "L" AND $x.birthYear > 2010
  9. Subquery Expression: SUBQUERY({<MyPlayground_Sources.Person: 0x60800007e940>}, $x, $x.name CONTAINS "L" AND $x.birthYear > 2010)
  10.  collection: {<MyPlayground_Sources.Person: 0x60800007e940>}
  11.  variable: x
  12.  predicate: $x.name CONTAINS "L" AND $x.birthYear > 2010
  13. Subquery expression result value: Optional(<__NSArrayM 0x610000046030>(
  14. )
  15. )
  16. Subquery expression value as [Person]: [] as follows

In this test result, line 1-7 explain that only one person "Bob" who is born in 1997 created as in a collection expression. The debug information at line 8 is the print-out during a predicate was obtained. From line 9-12 are information about building Subquery expression, and its three parameters: collection, variable and predicate. The information at remaining lines shows the Subquery expression evaluation result, and detail information as an array of Person or empty if no result.

If test is changed to name containing "B" and birth year greater than 1990, the person Bob will be in the result array:

  1. Creating Person object and friends...
  2. Person - name: Bob, birthYear: 1997
  3. Collection expression: {<MyPlayground_Sources.Person: 0x608000077fc0>}
  4. Collection expression result value: (
  5.    "<MyPlayground_Sources.Person: 0x608000077fc0>"
  6. )
  7. Person - name: Bob, birthYear: 1997
  8. Predicate: $x.name CONTAINS "B" AND $x.birthYear > 1990
  9. Subquery Expression: SUBQUERY({<MyPlayground_Sources.Person: 0x608000077fc0>}, $x, $x.name CONTAINS "B" AND $x.birthYear > 1990)
  10.  collection: {<MyPlayground_Sources.Person: 0x608000077fc0>}
  11.  variable: x
  12.  predicate: $x.name CONTAINS "B" AND $x.birthYear > 1990
  13. Subquery expression result value: Optional(<__NSArrayM 0x60800005cc50>(
  14. <MyPlayground_Sources.Person: 0x608000077fc0>
  15. )
  16. )
  17. Subquery expression value as [Person]: [<MyPlayground_Sources.Person: 0x608000077fc0>] as follows
  18. Person - name: Bob, birthYear: 1997

It is really fun to test Subquery expression in Playground.

Stay tuned for the power of Subquery expression and more interesting findings in my other tests.

Resources


Read More...

Friday, October 21, 2016

One-to-Many Relationship and Subquery

Recently I have to deal with a case in my app. In a one-to-many relationship, I need to define a predicate for many's element to be checked. Here taking Person as a simple class for example, as in following swift class:

  1. class Person {
  2.  var name: String?
  3.  var birthYear: Int?
  4.  var friends: NSSet?
  5. }

the Person class has three properties, name, birthYear, and friends. I use CoreData model to define Person entity. What I need to find a person whose has friends(at least one) and those friends has to meet certain criteria.

For example, find all person who has friends and at least one of friends' birth year is greater than 2000.

Soon I found a solution: I need to build a predicate with function Subquery. For above example, my fetch request can be built in following codes:

  1. let request = NSFetchRequest<Person> = NSFetchRequest(entityName: "Person")
  2. let predicate = NSPredicate(format: "SUBQUERY(friends, $x, $x.name CONTAINS 'David' && $x.birthYear > 2000).@count > 0")
  3. request.predicate = predicate

Subquery Function


The Subquery function is rarely mentioned, however, it is a very powerful to resolve some complicated one-to-many relationship.

The function takes three parameters:

  1. A collection
  2. a variable, and
  3. a predicate

Basically, the function will loop through the collection to verify each element if the predicate condition is true, and all the matched elements will be returned back as a collection or empty if none met. For above example case, the Subquery will enumerate each person in friends collection, return a collection of persons whose name contains "David" and whose (David's) birth year is greater than 2000.

For this kind or more complicated relationships, this function is very concise and powerful. For example, relationship may go one more level deeper: friends' friends whose name contains "Lisa" and whose (Lisa's) birth year is greater than 2005. For this case, nested Subquery can be used. That is, a Subquery contains another Subquery to verify one more deep relationship:

  1. let request = NSFetchRequest<Person> = NSFetchRequest(entityName: "Person")
  2. let predicate = NSPredicate(format: "SUBQUERY(friends, $x,
  3.  SUBQUERY($x.friends, $y, $y.name CONTAINS 'Lisa' && $y.birthYear > 2005).@count > 0).@count > 0")
  4. request.predicate = predicate

The Subquery function can further use ALL, ANY or NONE operator in the third predicate parameter on collection property for more complicated predicate conditions.

  1. SUBQUERY(friends, $x, $x.friends != nil && ALL $x.friends.birthYear > 2000)
  2. SUBQUERY(friends, $x, $x.friends != nil && ANY $x.friends.birthYear > 2000)
  3. SUBQUERY(friends, $x, $x.friends != nil && NONE $x.friends.birthYear > 2000)

Operator ALL, ANY or NONE applies to the left collection for all of, at least one, or none of element in the collection. In this way, frinds.friends's property(birthYear) can be added to complete the predicate condition.

As you can see, in all above codes, Subquery is used in NSPredicate, which is attached to NSFetchRequest to fetch entity objects in CoreData context. To test Subquery in various cases, I have to find some way to add objects to CoreData database. In most cases I had to run my app to do my tests. That's very time consuming and painful process.

Further investigating into Subquery, I found that Subquery used in NSPredicate is actually based on NSExpression. Actually, Subquery can be tested by using NSExpression with various samples of collections. My next blog will discuss this very interesting topic.


References


Read More...

Thursday, October 13, 2016

Localize Plurals in iOS

Apple emphasizes internationalization and localization since its start of iPhone development. This is actually a very wide and difficult topic in some areas. Plurals in various languages make it really hard to code. In iOS, a solution is provided to get localized plural string and it is very nice and handy.

You can find the solution in many articles if you google it. Basically, the solution is based on a Plist resource file and couple of functions.

By default, the resource file is named as Localizable.stringsdict. Another file should be created as well: Localizable.strings along side even empty.

In the current Xcode 8, there is no stringsdict file type when you add from New File... What you can do is to use Plist file type, and then remove plist extension from the file name. In this way, the XML file can be viewed in ASCII Property List or a hierarchical format.

Plist File Structure


The property list is based on dictionary or dict node to define hierarchical structure. Each dict contains a list of key-value property. Each value can be a string or dict (children set of key-value list). The reason to use dict is that each key within a dictionary has to be unique.

This resource file contains three levels of dict. The top dict contains a list of resource keys. Each key can be used by function NSLocalizedString to retrieve a format string for the resource file.

  1. <plist version="1.0">
  2.    <dict>
  3.        <key>number_of_files</key>
  4.        <dict>
  5.            ...
  6.        </dict>
  7.        <key>working hours</key>
  8.        <dict>
  9.            ...
  10.        </dict>
  11.        <key># of entities</key>
  12.        <dict>
  13.            ...
  14.        </dict>
  15.    </dict>
  16. </plist>

The second dict level contains a list of key-value pairs. The first pair is used to a format for a plural string: by key NSStringLocalizedFormatKey, and its value as the format string. For example:

  1.           <key>NSStringLocalizedFormatKey</key>
  2.           <string>Total: %#@files@, %#@subs@</string>
The string value normally contains one or more variables. Each variable is marked by %#@ as preceding, and @ as ending. The variable should contain a numeric value, therefore, the result of the variable would be a localized plural string.

The remaining key-value pairs define plural rule for each variable. Each variable is a key, and the paired value defines plural rule by the third level of dict. For example, the following is English plural rule for the variable files.

  1.           <key>files</key>
  2.           <dict>
  3.               <key>NSStringFormatSpecTypeKey</key>
  4.               <string>NSStringPluralRulType</string>
  5.               <key>NSStringFormatValueTypeKey</key>
  6.               <string>d</string>
  7.               <key>zero<key>
  8.               <string>%d file</string>
  9.               <key>one</key>
  10.               <string>%d file</string>
  11.               <key>other</key>
  12.               <string>%d files</string>
  13.           </dict>
  14.           <key>subs</key>
  15.           <dict>
  16.               ...
  17.           </dict>

The first two key-value pairs in the third dict level are as-they-are standard, no change. The remaining key-value pairs are for language specific plural rules. For English, the plural rule has three categories: zero, one and other.

Refer to the resources for language plural categories.

Functions for Plural Strings


With above Plist file defined, the localized plural strings can be retrieved by following codes:

  1. let numFiles = 3
  2. let numSubs = 1
  3. let format = NSLocalizedString(" ", comment: "")
  4. let text = String.localizedStringWithFormat(format, numFiles, numSubs)

The first function NSLocalizedString gets a localized format string from Plist, and the second function localizedStringWithFormat retrieves corresponding plural string based on numeric values.

I have written a simple function to get localized plural string by extension to String.

  1. extension NSString {
  2.  static func localizedStringForPlurals(formatKey key: String, comment: String = "", args: CVarArg... ) -> String
  3.    {
  4.        let format = NSLocalizedString(key, comment: comment)
  5.        let result = withVaList(args){
  6.            (NSString(format: format, locale: NSLocale.current, arguments: $0) as String)
  7.        }
  8.        return result
  9.    }
  10. }

It is much simple to use the extension function in my project:

  1. let text = String.localizedStringForPlurals(formatKey: "number_of_files", comment: "Total: # of file, # of sub", args: numFiles, numSubs)
  2. // or
  3. let text1 = String.localizedStringForPlurals(formatKey: "number_of_files", args: numFiles, numSubs)


Resources


Read More...