Saturday, August 11, 2012

DataGrid and Object Binding

Last week, one of my good friends asked me some questions about using DataGrid in Windows Form app. I looked at his codes. My first reaction, after I saw his codes, was to recommend him using object or class as data source binding instead of SQL or LINQ binding. I have experience using ASP.Net DataGrid with object binding in my previous work proejcts. I like this strategy very much. By using class as data source, as a developer, I have total control of how data being pumped into DataGrid. The comlicated SQL data structure should be left at SQL server side. The .Net project should forcuse on data and UI.

I quickedly showed him an example. First I added an example class MyData as a data object template. Then I added a DataGrid control on a Windows form. I used data source wizard from the form's DataGrid to set up its object data source to MyData. That was very quick and easy, based on my ASP.Net experience. However, the wizard does not provide a way to let me to tell which method the DataGrid to get data. It seems that DataGrid for Window Form is very different from the one for ASP.Net.

After that meeting, one day, I created an example project and tried to figure it out. Now I got the solution. Basically, in the case of Windows Form application, the data source for DataGrid should a be collection, not an object class. It is very different from the case of ASP.Net DataGrid. Since the data source is a collection, the data binding to DataGrid has to be manually added from DataGrid UI wizard. That's very easy to do: adding column header text and data binding property of DataPropertyName.

Here is the simple Windows Form application. I added a DataGrid to Form1.


DataGrid has a designer wizard. Leave the Data Source as default (none). Click on Add Column... to  define data grid columns. For this demo, add two columns: Name and Age, with column header names as: Column Name, Column Age.


In order to bind data to DataGrid, I need to edit columns from Edit Columns... in DataGrid designer. From there, change DataPropertyName to Name and Age.


With above DataGrid settings, I add a simple class of MyData, which will be used as objects to be displayed on the DataGrid with only two properties: Name and Age. I added another static method to return a collection of MyData objects. Here are my simplified codes:

Public Class MyData
 Private m_name As String
 Private m_age As Integer

 Public Sub New(ByVal nameValue As String, _
     ByVal ageValue As Integer)
   m_name = nameValue
   m_age = ageValue
 End Sub

 Public Property Name() As String
   Get
     Return m_name
   End Get
   Set (ByVal value As String)
     m_name = value
   End Set
 End Property

 Public Property Age() As Integer
   Get
     Return m_age
   End Get
   Set (ByVal value As Integer)
     m_age = value
   End Set
 End Property

 Public Shared Function GetObjects() As List(Of MyData)
  Dim list As List(Of MyData)
  list = New List(Of MyData)
  list.Add(New MyData("John", 12))
  list.Add(New MyData("Mike", 21))
  Return list
 End Function
End Class

In reality, this method (GetObjects) should contain codes to get data from database, or to call data bridge to get mapped data from database.

For the Form, the codes are very simple:

Public Class Form1
...
 Private Sub Button1_Click(ByVal sender As System.Object, _
   ByVal e As System.EventArgs) Handles Button1.Click
   Me.DataGridView1.DataSource = MyData.GetObjects()
 End Sub
...
End Class

The basic concept of this strategy is to make the app as simple as possible: only two element in the Windows Form application:

  • a Form with DataGrid as UI; and 
  • MyData as data source template.

In this way, the focuse can be placed on UI, to provide convenient and nice format for client. The data bridge part, which provides data, can be placed in another class, library, or SQL server.

Here is the result of the application:

Read More...

Friday, August 03, 2012

Finished Watching WWDC2012 Videos

Today I finished watching all available WWDC 2012 videos. There 111 video talk shows. I downloaded them in SD format, which are good enough. To view outlines, I found that I can go to HD area to get PDF files. In this way, I can separate videos from PDF files.

WWDC 2012 shows in iTunes grouped in serials. I started from 400 serial, Developer Tools, with 14 shows. Then 700 serial, Core OS, has 14 shows. 200 serial has 42 shows, which is the largest group. Next is 500, with 24 shows in Graphics , Media and Games. 300 serial is for App services, with 11 shows. The last serial, 600, has 6 shows.

I took some notes in Chinese for the first two serials. I cannot keep taking notes for all of the shows.

Reference


Read More...

Tuesday, July 31, 2012

Blogger Challenge

Recently, I have been puzzled by one challenge: update my blogger with a new view. I have been put image as an indicator of the topic in my blog post for long time. What I would like is to place the icon image off the main column just beside my post title, so that it would be much easy to see the topic for each topic, instead of reading title text. It seems simple task, however, with the limitation of Blogger I just cannot make it happen.

Here are what I tried. Starting from blogger template. I found a place to add a div just right before my post title. The div  has a margin like this style:

....
marin:0 -150%;
....

It does show on the left side of my post title. However, within the div, I could not find a way to change image, the icon for my post.

The icon image is defined in my post. It seems that there is no way to set a reference to a blog post element, such as image's src attribute value. There is a variable in blogger's template, but the values are defined within the template.

I might be possible by using Javascript codes. The difficult point is that how I can define a unique DOM element so that I can retrieve element's attribute value? In addition to that, the Javascript codes have to be trigger on Windows load to update out-fly icon images  from posts.

By the time being, I still could not resolve this puzzle. Any suggestions?

Read More...

Sunday, July 15, 2012

Stackoverflow Flaire is added to my blog

Today I finally fulfill my promise to add SO flair to my blog. I found this promise when I searched my blog for "stackoverflow" to see my previous blog on this web service. I soon found my promise on Feb 18, 2011.

To add this section of HTML codes to my blog template should be easy. However, I spent about half hour to do it. For my record, here is what I did.

First open my blog template and edit it. The place I can add is at almost end of the template:

....
<div id='sidebar-wrapper'>
 <b:section class='sidebar' id='sidebar' preferred='yes'>
   <b:widget id='AdSense1' locked='false' title='' type='AdSense'/>
   ....
 </b:section>
 
 <!-- David Chu added this StackOverflow claire here -->
 <br/>
 <p/>
 <p>David Chu&#39;s programming Q&amp;A at stack<b>overflow</b>:</p>
 <a href='http://stackoverflow.com/users/62776/david-chu-ca'>
   <img alt='SO profile for David.Chu.ca'
   src='http://stackoverflow.com/users/flair/62776.png'
   title='SO profile for David.Chu.ca'
   width='208'/>
 </a>
</div>
....

Now the above section of HTML appears at the end of this blog.

By the way, my SO reached to 4k on July 6, 2012. Actually, I have done almost nothing in the past month. It is the time and effort I invested in the past years, the contribution which programmers recognized, to bring my SO this milestone. My reputation points continues to grow, up to 4054 at the time I am writing this blog.

Read More...

Sunday, July 08, 2012

Animation Views

Navigation and Tab Bar controls provide a way to change views. This kind of change looks like one view being completely replaced with another view, or with animation from one view to another view. Sometimes, you may want to both views visible, with one view in transparent mode on the top of another view. This can be done by using UIView animation methods.

Here are some experience when I tried to use technique.

The basic animation method I use is:

[UIView transitionFromView:fromView
                   toView:toView
                 duration:default_animation_duration
                  options:animationTransiationMode
               completion:completion];

I had one issue with this practice with storyboard (iOS 5.0). The view (toView) being on the top of fromView was positioned with an offset from the top.


The above example shows a gap between the navigation bar and the toView (fromView is on the background). As a result, the bottom bar buttons are not visible because it is out of the screen.

This problem can be easily resolved in storyboard. In the storyboard, select the View Controller first. From the right inspector panel, UNCHECK the property: Resize the view from NIB.


With this fix, the result view is displayed as expected.


Reference

Read More...

Monday, July 02, 2012

Reset SQL Server sa Password

Recently I had a request to reset SQl server sa password. The sa was set up long time ago, but it was not documented. SQL as log in was required to set up administration configurations. This kind of case is very common at work. The following are my notes about this experience.

I soon found a solution to resolve the issue. Basically, you need to restart SQL server in single mode first. Then log in to the server machine by using user with Administrative privilege. The steps are very straight forward, however, I was caught for a while with one mistake. You have to put "-m;" in start up parameter at the beginning with no space afterwards.

The following is the screen snapshot of the property page within SQL server configuration tool. By adding "-m;" right at the beginning line of Startup Parameters, the SQL server will be in single mode in the next start up.


Although I was able to reset sa password by using SQL management studio after  SQL server was restarted, I could not log in to SQL server by sa afterwards. It was interesting that the sa Log was set to blocked. I had to unblock it with single mode on second try.  The following was my snapshot of correct setting. Note: the check box of "Login is blocked out" was set when I reset sa password first time.


Reference


Read More...

Tuesday, June 19, 2012

WWDC 2012 Videos Available Now

Today I got news about WWDC 2012 Videos available from Apple's Development site from Weibo. I will be busy to watch all those training videos. The following is the snapshot of iTunes.


Today I only downloaded the first section: Developer Tools with total 28 tracks (14 videos and 14 PDF  slides). HDs are nice but they take too much space and download bandwidth. I only got SD instead, good enough for my, and much quick and less space.

Reference


Read More...

Saturday, June 09, 2012

iOS 6 coming in WWDC 2012

According to the news from AppleInsider, iOS will be announced at WWDC 2012. This is really a welcome news. I have witnessed the evolution of iOS from it start. iOS was really good change with many improvements. For example, I like the storyboard very much. The storyboard makes the development much easy in terms of overall UI layout and workflow.


I guess there will be many great new changes in iOS 6.0. What I want the most is the generic template. It seems to me that I cannot define a generic protocol with generic in iOS or Objective-C, something like:

@protocol myAbstractInterface : NSObject <T>
- (void) methodA<T1>:(T1*) parameter1;
@end

where myAbstractInterface is a template, T and T1 are a generic data types.

Currently, I have use concrete class types for T and T1. I hope Apple would make this feature available so that it makes true OO design much easier. Apple iOS architecture designers may have their own reason not to implement generics in this way, or they may introduce generics with difference strategies, or more efficient and elegant framework.

I'll keep close eye on the coming WWDC in just about 2 days.

References


Read More...

Thursday, June 07, 2012

Change iOS Navigation App to Tab and Nav App

I have an app with UINavigationController as start view. Later on, I wanted to to change the start view with both navigation bar on the top and a group of tab bars on the bottom. There are many apps like this style, however, there is no template for this type of app in XCODE.

This is a frequently asked question on web for iOS development. There are some information available, but most of them are iOS 4.0 or early with xib based interface. For iOS 5.0+, Apple introduced storyboard. I struggled for a while, but finally I figured it out. The fact is that it much easier in iOS storyboard than the previous IB(Interface builder).  Here is the summary of what did.

Add Tab Bar Controller as Start View


My app was designed with XCODE Navigation template.  In the storyboard, the first view of my app's workflow is a Navigation Controller:


I want to change my app's first view with both navigation on top and tab bars on bottom respectively. The first thing I changed was to add a Tab Bar Controller, which is available from storyboard's library (inspector view on the bottom in XCODE). Just drag and drop the Tab bar controller to my storyboard.  Here is what Tab Bar Controller looks like in the storyboard.


Notice that there are three view items being placed in.  The first one is the root or master view: Tab Bar Controller, and other two are normal View Controllers, each with one Tab Bar Item on the bottom in its view. For the later two view controller items, the image and text can be changed from inspector. In addition to views, there are two segues, relationship segue type, being used to link the master Tab Bar Controller to other tab items.

Now it is time to make changes. First, I need to change the master, Tab Bar Controller, to my app's start point. This can be done by checking inspector's property: Is initial view Controller:


Notice that an arrow is added to the Tab Bar Controller on the left.

Then, control+drag Tab Bar Controller on the bottom of the view (right icon) to an existing Navigation Controller. A pop up menu is displayed.  Choose Relationship segue from the pop up menu. That's it! The app is changed to an app with both navigation and tab bars in the first view.

To change the position of tabs, just drag a tab icon and move it around.

Based on this practice, it is very easy to add more view controllers to the tab bar controller: use the relationship segue to link the tab bar controller and other view controllers. All those can be done by just dragging and dropping.

Add Navigation Controllers


To add navigation controller to the start view, simple drag and drop relationship segues so that the existing or the newly added navigation controllers as the next controller after tab bar controller, before other view controllers


Two controllers in a sequence in this way, as a result, will make the start view showing both navigation bar on the top and tab bars on the bottom.

iOS' storyboard makes the change so easy. I really like the improvement of iOS 5. The following sections are additional information about those controllers and my experience of using them.

iOS Controllers: Tab Bar and Navigation


It is important to know that both Tab Bar Controller and Navigation Controllers are only a view component. They are not View Controllers. In other words, they are part of view or window on iPhone or iPad.

Initially, I tried to create customized class based on tab bar controller with navigation delegate.  However, I could not associate my customized class with view controllers. Soon I realized that my customized class is NOT VIEW CONTROLER. In storyboard, the class for Tab Bar Controller or Navigation Controller is Controller, but not View Controller (for example, UITabBarController and UITableViewController).

Both controllers are visible in view controller class, where they are part of view and they direct view flow. For example, the following codes are some examples in a view controller to access to either Tab Bar Controller or Navigation Controller, as well as navigation item.

NSInteger row = [self.tabBarController selectedIndex];
[self.navigationController popToRootViewControllerAnimated:YES];
self.navigationItem.rightBarButtonItem = self.editButtonItem;
self.navigationItem.leftBarButtonItem = nil;

Access to Tab Bar Controller and Tab Bar Item


If you set view's title with a string, the tab bar item's title will be changed, as same as the view's title. Normally, I prefer the tab bar item's title shorter than view's title since tab bat item has limited space. Here is a tip to set tab bar item's tile with a short string and set the view's title with a long string:

self.navigationItem.title = @"Edit entities";
self.navigationController.tabBarItem.title = @"Edit";

Within the storyboard, a tab bar item has a tag property.  This tag's data type is integer. Many developers use the tag value as an identifier for a tab bar.

One thing I realize is that a tab bar item cannot be set as an outlet in a view controller class. The reason is very simple, the "view" class that the tab bar item resides is a controller but view controller. Therefore, you cannot control-drag a tab bar to a view controller as an outlet.


However, it is possible to define a customized class based on UITabBarController and then control+dragging the tab bar item to the customized class as an outlet.  Here is an example I tried:

// my customized class for UITabBarController
@interface NavigationWithTabBarController : UINavigationController

@property (weak, nonatomic) IBOutlet UITabBarItem *myTabBarItem;

@end

// In my view controller .m class
UITabBarItem* tb = [self.navigationController
 performSelector:@selector(myTabBarItem)];

if (tb.tag == 1) ...

Later, I found out that actually, I don't need to define my customized class at all. The tab bar item is accessible from view controller's navigation controller:

// In my view controller .m class
UITabBarItem* tb = self.navigationController.tabBarItem;

if (tb.tag == 1) ...

Even though, I make this note on this experience. There may be cases where a customized class is needed.

Another tip is about disabling tab bars or making tab bar controller on the bottom invisible. With both tab and navigation bars as start view, the tab bar will  always be displayed along navigation. In some cases, you may want to make tab bars invisible. To do that, just  overwrite the following method in your view controller class like this, making tab bars invisible:

#pragma mark - UINavigationController methods overwrites

- (BOOL) hidesBottomBarWhenPushed {
   return YES;
}

To disable tab bar items, for example, to prevent switching to other tabs while editing table view cells, use the following method:

- (void) setTabBarItemsWhileEditing:(BOOL)editing {
   for (UITabBarItem* tabBarItem in [self.tabBarController.tabBar items]) {
       [tabBarItem setEnabled:!editing];
   }
}

This method is also used to enable them when not in editing mode.

Read More...

Saturday, June 02, 2012

CSS Style and HTML PRE tag

I have been puzzled by my recent posts with source codes. I realized that the horizontal scroll bar does not appear in my source code blocks. The only thing I changed was to change the background color from white to black. I have not figured it out why until today.

The technique I used in my Blogger CSS is to define a class with this attribute:

white-space: nowrap


This should be able to let text in a block (div) auto flow horizontally. Today, I examined my previous posts and recent posts, and find nothing wrong with my updated CSS. My div class have the attribute. After looking at context of my code blocks. I saw that I use pre HTML tag to around my codes. In Safari's inspector, the attribute has been overwritten:

white-space: pre;

That's it! Then I tried to bring my white-space back to nowrap like this:

.nowrap > pre:first-child { ## class nowrap then next first child pre selector
 white-space: nowrap ## no wrap
}

This resolves the issue, however, all the codes are in one line. The line breaks within pre blocks are all ignored. Actually, pre HTML tag means to preserve all the format of text within the block. It seems I cannot resolve the issue with both white-space as nowrap with pre HTML tag.

The solution is to add line break tags <br /> within codes and not using pre HTML tag.

Read More...

Wednesday, May 23, 2012

Sync Data Changes Between Views

Sometimes you may want to sync data source between two views. For example, one view is for displaying data and another for editing. If these two views are associated with tab bar controller, any changes in the edit view should be reflected on the display view. Right?

Here is the tip: make sure the data source context in both views are the same one. The data source context behaviors like a cache for holding all the source source objects. Any changes in the context will be magically refreshed in both views. To do that, simply create one class with singleton object of UIManagedDocument.

// in .h file
@interface MyAppDBManager : NSObject

+ (UIManagedDocument*) database;
@end

// .m file
@implementation MyAppDBManager

+ (UIManagedDocument* ) database {
 static UIManagedDocument* db = nil;

 if (!db) {
   NSURL *url = [[[[NSFileManager defaultManager]
     URLsForDirectory:NSDocumentDirectory
            inDomains:NSUserDomainMask]
            lastObject]
            URLByAppendingPathComponent:@"My database"];
   NSURL*
   db = [[UIManagedDocument alloc] initWithFileURL:url];
 }

 return db;
}

@end

The following is an example to use the database in a table view:

#implementation
@synthesize myDatabase;
@synthesize fetchResultController;
...

- (void)setup {
  NSFetchRequest* fecchRequest = ...

  self.fetchResultController = [
    [NSFetchRequest alloc]
    initWithFetchRequest:fetchRequest
           managedObject:self.myDatabaese.managedObjectContext
      sectionNameKeyPath:...
               cachename:...];
  ...
}

- (void) viewWillAppear:(BOOL)animated {
  [super viewWillAppear:animated];
 ...
  self.myDatabase = [MyAppDBeManager database];
 ...
}

Since the instance of myDatabase is singleton object, its managedObjectConext is only one as well. So that any other views will share the same context as long as the database is from MyDBManager class.

One thing the data source you need to reload is the case of tab bar view controller. Tab bar view controller provides a way to switch among several views. When they are loaded, I found that there is no magical to refresh changes. What I did is to add the reload in a view controller's will appear event:


- (void) viewWillAppear:(BOOL)animated {
 [supper viewWillApear:animated];
 ...
 [self.tableView reloadData];
 ...
}

Read More...

Monday, May 07, 2012

Use VIM for Objective-C Syntax Highlighting

In my previous blog, I mentioned about using VIM for code editing. One of VIM feature is to provide syntax highlighting. I think that I added object-c syntax highlighting to my VIM long time ago. However, when I tried to edit a .m file, I did not see the colorful syntax.

I checked my ~/.vim folder and I found some plugin files for cocoa there. I must have done the objective-c syntax stuff. The file type for objective-c is not .m or ft=m. The file type should be something else.

Quickly I found the file type. Here is the command to enable syntax for objective-c file content:

:set ft=objc

Reference


Read More...

Wednesday, May 02, 2012

Set Image Programmatically

In my iOS project, I have a button. I want to add image to its view in codes. The reason I want to do it is that I have another class with API to provide image. The class uses database entity. If the entity contains a property of imagePath, the image will be loaded from the path; otherwise, the image will be from the app as default image.

I tried to use the following codes to load the image:

- (void)viewDidLoad
{
    [super viewDidLoad];
    self.imageButton.imageView.image =
      [MyImageManager imageForEntity:self.entity]
}

The above codes do not set image at all. I checked my image and there are loaded from my API.

After googling for a while, I found the reason. There is setImage message for button's image with additional parameters. I have to explicitly call this message to set image.  Here is my updated codes:

- (void)viewDidLoad
{
    [super viewDidLoad];
    [self.imageButton setImage:
      [MyImageManager imageForEntity:self.entity]
                            forState:UIControlStateNormal];
}

There are more states available to set images for a button:

enum {
    UIControlStateNormal       = 0,
    // used when UIControl isHighlighted is set
    UIControlStateHighlighted  = 1 << 0,
    UIControlStateDisabled     = 1 << 1,
    // flag usable by app (see below)
    UIControlStateSelected     = 1 << 2,
    // additional flags available for application use
    UIControlStateApplication  = 0x00FF0000,
    // flags reserved for internal framework use
    UIControlStateReserved     = 0xFF000000
};
typedef NSUInteger UIControlState;

Read More...

Configure git as XCODE Repository

There is one lecture, Xcode and Source Code Management (October 7, 2011), in the open course of Developing Apps for iOS 2011, by Paul at Stanford University.

Paul demonstrated how to use git as a repository for XCODE source code management. To set up a repository, first, quit XCODE completely, and use Terminal command to set it up.

Set up git Repository


There is one file in XCODE project which saves XCODE UI information. Paul recommended not to check it in. This is a file like xxx.xcuserstate.  To find this filename, change the directory to the project path, and user find command to get the file:

$ cd ~/myprojectpath
$ find . |grep "xcuserstate"

This will find a file name with "xcuserstate". Use the following command to exclude the file:

$ echo xxx.xcuserstate > .gitignore

Then initialize the git and add the source codes (assume the source codes are in the current folder):

$ git init
$ git add .

Use the commit command to seal the change:

$ git commit -m "This is my source code repository with first check-in"

Now the repository is set up. The lecture shows more about how to use the repository to check in changes, comparing changes, and creating branches.

Reset git Repository


In about two days, I have experience fatal error to checking my codes. My case was caused in core data module. I added one to my project, and later on I renamed it. After several files changed, I got fatal error when I tried to check in my codes. The problem is that my renamed data module file cannot be found.

I could uncheck this missing files from commit folder detail on the left panel. However, I cannot ignore or remove this change. Since I have a project with not much changes in repository, I decided to reset my repository.

What I did is to exit XCODE first. From the terminal, local the .git folder and remove it:

$ rm -r .git

This will remove all the files in the repository. There may be a lots of prompt to confirm deleting since files within the folder are read-only. I had to press 'y' to remove all of them.

After removing the repository, I repeated the above steps to get a fresh repository. There may be a way to leave the repository there and create a new one in different repository. I'll update this information when I find the way.

References


Read More...

Monday, April 23, 2012

git Configuration

I have not used git for my source code repository on my Mac. Today, I realized that git is not available in my Terminal. Actually, after googling, I found that git is in my Mac, but not in my PATH.

The git sits in my /usr/local/git folder.  The binary tool is at bin there. So I need to add git to my PATH. This can be done by vim editor:

vim ~/.profile

Add or update the following line:

export PATH="$PATH:/usr/local/git/bin:"

Save the change and exit VIM.

Run the following command to load the path from .profile:

source ~/.profile

Now the git is available in Terminal!

Read More...

Friday, April 13, 2012

VIM Tip: Not Containing Pattern (3)

I find out that Lookaround zero width assertions are very powerful and useful. The more I use it the more I like it. Think this search strategy as match a pattern with addition zero width or hidden pattern together.  This can filter some parts out, which cannot be done just by matching a pattern.

I have used this technique resolving many of finding and replacing issues. Normally, I use search first to make sure the results meeting my expectations. Then I use replacement to substitute the results with my expected contents. Here are some examples. As you can see that it is very productive. For sure, it does require a lots of brain energy to think and to try hard. However, this will sharp you brains. I really enjoy learning and using VIM.

Examples


Let take pseudo codes I used in my previous blog as example. A simple search is to find character 's', and the next character is 't' as zero width, look ahead.  The search command is:

/st\@=

This tells that first token is 's'. The search engine searches for the token as a pattern. When it is found, the engine stops at the found position in the string. Then, the engine looks for the next token 't'. The look-ahead tells the engine to construct the next search for the second token from the substring afterward the first token.  The engine continues to search for the second token as an immediate match. If there is a match, the complete pattern is found. The first token 's' is a matched result as return; if there is no match, the match is failed.


The next simple example is look-behind zero width assertion command:

/\(s\)\@<=t

The pattern to be matched is 't', which is also the first token. The second token is a group of characters 's'. When the first token is found, the search engine stops. The look-behind tells the search engine to take the substring behind as the next search from this position.  If the match (second token) is found right behind the position, a complete match successes, and the first matched token is returned as a result. The following snapshot shows three results of 'ring's:


More Complexed Examples


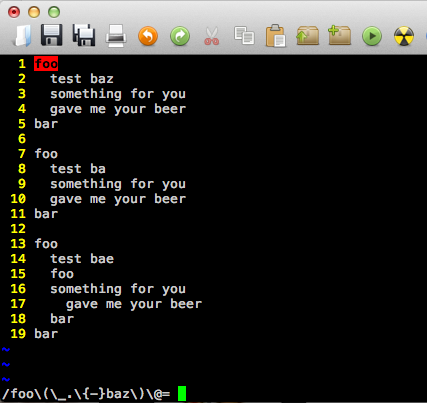
The following text are some blocks of foo...bar:

foo
  test baz
  something for you
  gave me your beer
bar

foo
  test ba
  something for you
  gave me your beer
bar

foo
  test bae
  foo
  something for you
    gave me your beer
  bar
bar

Here is a command of searching for foo...bar block containing 'baz':

/foo\(\_.\{-}baz\)\@=\_.\{-}bar

Notice that the text within the foo...bar block may contain multiple lines of text. Here \_. is for multi-lines of text. \{-} is none-greedy match, which means matches 0 or more of the preceding atom, as few as possible.  The above search can be described as searching for:

'foo' as start, next zero width pattern: 0 or multiple lines of text till 'baz', then 0 or multiple lines of text till hit 'bar'


You may verify the command by break the search command into two parts, the first part is:

/foo\(\_.\{-}baz\)\@=


The command of searching for foo...bar loop not containing 'baz':

/foo\(\_.\{-}baz\)\@!\_.\{-}bar


Search for the most inner foo...bar block command:

/foo\(\_.\{-}foo\_.\{-}bar\)\@!\_.\{-}bar


Sometimes, I want to add line break tags to the end of a line, but not to the empty lines.  This command can be used to add <br /><br /> to the end of any none-empty lines:

:%s:.\@<=$:<br/><br/>:g


The next example is a very useful one. I often use VIM convert program codes into HTML format. Some times, I need to convert a group of spaces into &nbsp;s, except the first space. This is an excellent case to use lookahead zero width assertion. I figure it out and it becomes my favorite the search and replace commands.

/\(\s\)\@<=\(\s\)\+


After examining the results, I use the following replacement command to do the conversion:

:%s:\s\@<=\s:\&nbsp;:g


Reference


Read More...

Friday, April 06, 2012

VIM Tip: Not Containing Pattern (2)

In my previous VIM tip blog, I mentioned about searching for a pattern of a expected word with not expected word afterwords, for example, 'tablespace' followed by a word not starting with 't'. When I tried to the pattern in an opposite way, I could not figure out how to do a match. For example, a word not starting with 't' followed by a word of 'tablespace'.

I think that I figure it out now, but it took me a while to google and digest the related information. I think it is worthwhile to study this. I am writing this blog to summarize my findings.

Lookahead and Lookbehand Zero-width Assertions


At first I thought about match a pattern not containing another pattern should be as simple as using a negate or ! operator to identify not-containing-pattern. There may be a not operator in VIM search, but I could not find it. What I found is Lookaround Zero-width Assertion.

In VIM, the way of search for a pattern not containing another pattern is very smart and elegant. The basic search is to find all matched patterns, and the matched items are returned as results. In VIM, the following is a search command:

/PATTERN

the pattern can be a regular expression.

In VIM, zero width pattern is a pattern to be matched but not in the search results. Think zero width pattern as additional match condition, it can be described as either of following ways:

PATTREN + ZERO_WIDTH_ATOM or
ZERO_WIDTH_ATOM + PATTERN

The first one is called as lookahead zero width assertion, and second one as lookbehind zero width assertion. Assertion here means matched or not matched. The above two are positive assertions. If we take negative or not matched into consideration, there are four types of look around with zero width assertions. They are:

/PATTERN[ZERO_WIDTH_ATOM\@=]
/PATTERN[ZERO_WIDTH_ATOM\@!]
/[ZERO_WIDTH_ATOM\@<=]PATTERN
/[ZERO_WIDTH_ATOM\@<!]PATTERN

Note: [...] is used as optional and also as separator from pattern, [ or ] are not part of search.

As my understanding, VIM uses symbolic like character for look around. As other special characters in VIM, \ is used to indicate look around with zero width assertion. The following table summarizes characters used for this type of search:

\@  indicate lookahead
\@<  lookbehind
=  positive match
!  negative or not match.

In above searches, PATTERN is to be matched. If ZERO_WIDTH_ATOM is supplied, it will be used as additional assertion. If there is any match, the matched pattern items will be returned as results, but ZERO_WIDTH_ATOM is not in the results. That's why it called as zero width.

According to VIM documentation, the definition of ATOM is a character, or a character class, or a group (indicated by \(...\) braces).

Think the Search as a Program


Lets think those type of searches as a program. Here I have the following c-style pseudo codes:

Results getMatchedResults(
   string context,               // basic
   string pattern,
   string zero_width_pattern,    // zero_width pattern
   bool match_zero_width_pattern,
   bool lookahead)
{
  results = EMPTY_LIST;
  result = getMatchedResult(context, pattern);
  while (result != EMPTY)
  {
    if (zero_pattern != EMPTY)
    {
      if ( lookahead ) {
        context_tmp = getNextContextByLookahead(context, result);
        result_tmp = getMatchedResult(context_tmp, zero_width_pattern);
      } else {
        context_tmp = getNextContextByLookbehind(context, result);
        result_tmp = getMatchedResultByLookbehind(context_tmp,
                       zero_width_pattern);
      }
      if ( result_tmp == EMPTY ) {
        if (match_zero_width_pattern) {
          result = EMPTY;
        }
      } else {
        if (!match_zero_width_pattern) {
          retult = EMPTY;
        }
      }
    }
    if ( result != EMPTY ) {
      results.add(result);
      context = geNextContextByLookahread(context, result);
      result = getMatchedResult(context, pattern);
    }
  }
  return results;
}

The pseudo codes are very straightforward. Actually, VIM search is based on Regex as its search engine. The above search expression commands are basic Regex patterns.


References


Read More...

Sunday, April 01, 2012

Steps to Delegate in iOS

I am back to the course of iOS Development by Stanford University. Last week, I watched Lesson 9 Table Views(October 25, 2011). Instructor Paul Hegarty mentioned 5 steps about Delegate at 1:04:15.

He talked the confusion for new developers when they use protocols.  The 5 steps are clear explanation on how to use and implement protocols. He also showed the steps in his demo.


  1. Create the @protocol
  2. Add delegate @property to delegator's public @interface
  3. Use delegate property inside delegator's implementation
  4. Set the delegate property somewhere inside the delegate's @implmentation
  5. Implement the protocol's method(s) in the delegate(include <> on @interface)


In the demo, the protocol CalculatorProgramsTableViewControllerDelegate is created in CalculatorProgramsTableViewController.h:

@class CalculatorProgramsTableViewController;

@protocol CalculatorProgramsTableViewControllerDelegate

@optional
- (void)calculatorProgramsTableViewController:(CalculatorPorgramTableViewController *)sender
                                 choseProgram:(id)program;
@end

In CalculatorProgramsTableViewController.h, the delegate is created in the controller as weak id <...> delegate:

@interface CalculatorProgramsTableViewController : UITableViewController
...
// Define a property delegate
@property (nonatomic, weak) id<CalculatorProgramsTableViewControlerDelegate> delegate;
...
@end

In its .m file, the delegate property is defined by @synthesize delegate = _delegate.

@implementation CalculatorProgramsTableViewController
...
@synthesize delegate = _delegate;
...
@end

In the event of a row cell being selected, the delegate is used:

#progma mark - UITableViewDelegate

- (void)tableView:(UITableView *)tableView
    didSeelectRowAtIndexPath:(NSIndexPath *)indexPath
{
  id program = [self.programs objectAtIndex:indexPath.row];
  [self.delegate calculatorProgramsTableViewController:self
                                          choseProgram:porgram];
}

Next, where the delegate is set? in the event of controller segue. The delegate method is implemented in the controller:

@implementation CalculatorGraphViewController
...
- (void)prepareForSegue:(UIStoryboardSegue *)segue
                 sender:(id)sender
{
  if ([segue.identifier isEqualToString:@"Show Favorite Graphics"]) {
    NSArray * programs = [[NSUserDefaults standardUserDefaults]
      objectForKey:FAVORITES_KEY];
    [segue.destinationViewController setPrograms:programs];
    [segue.destinationViewController setDelegate:self]; // set delegate
  }
}

Lastly, in order for the graphic view controller to know the change of a program, the controller has to implement the delegate method. The protocol method will be called when the delegate sends out its message: a row in table view being selected:

// in .h file, the protocal delegate is defined as the controller's interface
@interface CalculatorGraphViewController : NSOjbect
             <CalculatorProgramsTableViewControllerDelegate>
...
@end

//In .m The protocol method is implemented
- (void)calculatorProgramsTableViewController:(CalculatorProgramsTableViewController *)sender
                                chooseProgram:(id)program
{
  self.calculatorProgram = program;
}

"That's all we need. OK!", Paul said.

References


Read More...

Saturday, March 24, 2012

VIM Tip: Not Containing Pattern (1)

Here is one tip I used last week when I tried to use VIM to match strings with a pattern not containing a pattern. The requirement is about a group of PL/SQL scripts. I have to update some lines in the script containing "tablespace xxx", where xxx is a table space name. There is one exception: don't change "tablespace temp".

I decided to use VIM Search and Replace feature to do the job. Since my search is case insensitive, first, I use the following command to tell VIM to ignore case for my search:

:set ignorecase

Then I used the following search pattern:

/tablesapce\s\+\(t\w\+\)\@!

This search is for any line containing word "tablespace" following any spaces, but the following word  beginning with "t". The following table explains some special characters in VIM:

ItemDescription
\swhitespace character
\+matches 1 or more of the preceding characters...
\(...\)enclosing a pattern as a group.
\wwork character
\@!not containing
\nthe matched pattern in the n pair of \(\), for example, \1 for the first matched group \(\).

Here I used group pattern with containing trick "\@!", which means that the word in the group does not  contain a word beginning with "t".  In my case, "tmp" is an example.

After I verified that the search result meets my requirement. The replace is used:

%s/\(tablespace\s\+\)\(t\w\+\)\@!/\1MyTablespace/gi

\1 is the matched the group 1, i.e., "tablespace" plus white space. Here gi means global and ignore case.

Read More...

Saturday, March 17, 2012

Add Wolfram|Alpha Query Box in Blog

I have spent some time on WolframAlfram(WA) computable knowledge engine during evenings recently. What I found is that all Wolfram products, projects or apps are based on Mathemetica software or application. For example, WA, CDF(computable document format), and Mobile apps.

From WA web page, I find a link about how to add WA to blog or web sites. The HTML script is very simple one. There are serval sizes available. Here is an example to add a small size WA:

1 <script id="WolframAlphaScript" 
2   src="http://www.wolframalpha.com/input/embed/?type=medium"
3   type="text/javascript">
4 </script>

Here is what it looks like:

However, I could not find a way to put a query text into the WA input box directly. In WA, you can type a query text there, for example, pi. From there, I can get a URL about the query:

http://www.wolframalpha.com/input/?i=pi

As a result, an alternative way to add a WA query is to add a link with a query text:

Query: pi


References

Read More...

Saturday, March 10, 2012

CodeRetreat and Corey Haines

On my way home from work, I listened to Hansleminutes podcast on 3/1/2012. The podcast was a talk with Corey Haines. By the end when Hansel mentioned about Corey's coding and boarding experience, I immediately recalled the Corey! He is the man who was on .Net Rocks talk several years ago. Since then I followed him on Twitter.

His story impressed me. That's quite adventure way to update development skills. After I left his job in 2009, he started his one-year journey cross US, pair programming for a room and board. He mentioned in the .Net Rocks interview that he mention various people, include some gurus. I think that that year he learned a lot. Just like in his web page, he was like "a bee" to suck knowledge and development skills from people. Even at times he was working with people at the same or less level as him, he still practiced his presentation and personal skills. I think he was single at the that time.

I sent him a tweet to ask if he was the person on the .Net Rock podcast after the talk. I have never got his reply. That's OK. I knew that was him. Since then(by the end of 2009), I have not heard anything about him.

It was a refreshing news when I heard him again on Hanselminutes. This time, Corey talked about his project of code retreat. Basically, it is a kind intensive training, one whole day. A group of people repeat about 5 rounds of 45 minute pair programming focusing one specific problem. I really like this kind of project. I joined his coderereat organization on the same day after the podcast (in the evening).

I think that the project of coderetreat is a continuing and extension of his journeyman of programming. The journeyman was just one-to-one experience. Now he extends it to group of people.

In addition to his talk about coderettreat project, I found that he has been actively providing consulting services, talks, and some projects. In his web page, there are two web-based projects: MercuryApp and Slottd. MercuryApp provides a tracking service for any thing. Basically you score your feeling about project, word, thing or anything else. If you keep entering scores over a period of time, you may gain a view over the item you have tracked. You need to create an account with your email.


Slottd is a simple scheduler web service. You don't need an account to use. However, you do need to provide an email for your to update your schedule later one. For example, I created one meeting for the next Monday with 2 spots available. After the schedule is created, you will get two temporary URLs by email: one for update and another one for people to take the spot. It is a simple idea and quite useful. I think that this service might be a result of their code retreat projects.


All those web services are simple ones, but they are great examples to work together. Within a short period of time,  a team work on the project in Agile. Every one will learn from it by hands-on-codeing.

Another developer who has great impact on programming skills and my life is Jean-Paul Sylvain Boodhoo. When I was working as a consultant at Bantrel, JP was invited to provide one week training on .Net with TDD. That was great training. Even during the day I had to work(no contractors were invited for free), I went to the training session after work 5:00pm immediately. He was so passionate with the training. He should finish by 5:00PM, but he just went to late 9:00PM, even 11:00PM. That experience fired my up. Since then I started to keep my skills update to date with my passion.

Not sure if there are any one in Calgary area like to form a similar project. The start may have just couple of developers. This kind of activity will tremendously benefit development skills for sure.

References


Read More...

Thursday, March 08, 2012

More on XSLT Transformation

In my previous blog, I described how I used XSLT transformation to convert XML content to HTML content. That one is a very simple example. This technique is not very commonly used but I think it is very useful. As I mentioned that I used the same technique more than 10 years ago. Here I add more on this issue for my personal references.

The previous example is based on an XML file from my SQL Server Profiler tracing result: I want to convert all the interested Column nodes under Event into a HTML table. Last week, I realized that all those events can be further divided into three SQL groups based on SQL calls: Current, Data and TagInfo. It would be nice if I could create three HTML tables to summarize those results. I spent some time to explore more on XSLT transformation. The following are some related transformation elements I used.

XSL Variables


In XSL, variables can be defined for reuse. I need three HTML tables. Each has the same headers and footers. I found that by defining variables, it is a very neat strategy to create my HTML tables with constant herder and footer.

  <xsl:variable name="header">
    <tr bgcolor="#9acd32">
      <th>Row index</th>
      <th>CPU</th>
      <th>Reads</th>
      <th>Duration</th>
      <th>Writes</th>
    </tr>
  </xsl:variable>
  <xsl:variable name="footer">
    <tr bgcolor="#9acd32">
      <th>Total</th>
      <th></th>
      <th></th>
      <th></th>
      <th></th>
    </tr>
  </xsl:variable>

Here are variables: header and footer, each corresponding to HTML table header and footer sections.

In the next section, you will see how those variables are used.

One limitation of XSLT variables is that they are immutable. That means you cannot change value after a variable is defined or created. I would like to have some variables to sum all CPU, Reads, Duration values, but I could not figure out how. My solution is to copy my HMLT table results and paste them to Excel to do the calculation.

XSLT If Element


I used XSLT If element as a predicate for my HMTL table content:

<table border="1">
  <xsl:copy-of select="$header"></xsl:copy-of>
  <xsl:for-each select="TraceData/Events/Event[@name='SQL:BatchCompleted']">
    <xsl:if test="starts-with(Column[@name='TextData'], 'EXEC sp_PVSQL_Template_MANUAL_Data')">
      <tr>
        <td>
          <xsl:value-of select="position()" />
        </td>
        <td>
          <xsl:value-of select="Column[@name='CPU']" />
        </td>
        <td>
          <xsl:value-of select="Column[@name='Reads']" />
        </td>
        <td>
          <xsl:value-of select="Column[@name='Duration']" />
        </td>
        <td>
          <xsl:value-of select="Column[@name='Writes']" />
        </td>
      </tr>
    </xsl:if>
  </xsl:for-each>
  <xsl:copy-of select="$footer"></xsl:copy-of>
</table>

The above codes also show the usage of my XSLT variables for my HTML header and footer sections.

XSLT Functions


In above codes, I used an XSLT function in XSLT If test: starts_with(a, b). This is a useful string function to check if string a starts with b string, case sensitive. The function of position() is used to get XML Row index, which is a reference node position in the original XML content.

However, the parameters of the function have to be in the correct case, case sensitive. I tried to use lower_case() and match() function. Unfortunately, those functions are only available in XSLT 2.0. The tool of XML Notepad does not support XSLT 2.0, nor I can find updates for the tool.

References


Read More...